
Installation Guide
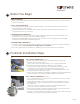


STEP 3: COMPLETE YOUR FIRST ROW OF FLATS (see Fig. 3)
1. Lay out your ProPanel flats, pulling from your blended stone pieces, ensuring you
are mixing your long and short pieces for a blend of colors and sizes.
2. Ensure you are installing ProPanel left to right.
3. Install the first row by bending the bottom clips up until they are flat behind the
stone, then fit the panel snug against the bottom of the starter strip.
4. Check panel for level prior to fastening to the substrate.
5. While gently pushing down and back, insert screws into the top eyelets of the
leveled panel. Fasteners should be evenly distributed over the entire panel to
support and attach all top edges of the installed panel.
Each square foot of ProPanel should be installed with a minimum of 3 screws
fastened to the top of the stone.
Cut ProPanel pieces should not be less than 6” in length and require a minimum
of 2 screws fastened to the top of the stone.
6. Ensure each stone is properly attached before installing the next stone.
7. Cut flat pieces as needed. Each piece must always have a minimum of two points
of attachment by fastener on the top of the stone. If necessary, cut pieces to the
left or right of the clips to allow for the minimum amount of fasteners needed,
keeping the piece at least 6 inches in length.
STEP 4: COMPLETE YOUR OTHER ROWS (see Fig. 4)
1. Continue to install blended ProPanel pieces from left to right.
2. For your second row and beyond, tuck the bottom legs behind the stone below.
3. Continue installing ProPanel by following points 4-7 in Step 3.
STEP 5: ADD YOUR ACCESSORIES (see Fig. 5)
20” long wainscot sills are sold separately for capping wainscot or as a windowsill.
Special pieces, such as outlet covers, are sold separately. Please consult the
manufacturers literature for availability.
page 3
Fig. 4
Fig. 5
Fig.3
ProPanel
Suggestions for Finishing / Trimming Your Installation
We suggest leaving a 3/8” gap between the top of the stone course and
soffit during installation to allow room for the house to settle in case of
board shrinkage, and to keep the top course of the stone panels from
crushing the soffit.
Depending on your finish location, install a J Channel with a flexible strip
to transition to soffit. Note that this transition may need to be caulked
and should be verified with the siding manufacturer.
Cut the top tabs off the ProPanel, leaving the bottom tabs in place to
properly secure to the stone below.
There are several ways to finish the top course:
If you have not removed the fastening flange, use a PVC trim board to hide
the fastening flange of the top course.
If you removed the fastening flange of top course, install partial panels.
Attach shutters, mailboxes, and other final additions to stone panels using the
proper hardware for mounting into masonry. Following the manufacturer’s
instructions for mounting to stone or masonry products, use a masonry bit to
drill holes and avoid drilling in between seams in the stones when possible.
We recommend adding a gutter extension to avoid splashing water on
your panels.