
Installation Guide


STEP 1: ATTACH STARTER STRIP (see Fig. 1)
Starter strip is required at the bottom of a wall and across the top of all
windows, doors, and other openings.
Cut the starter strip to the length of wall you are covering with ProPanel.
Ensure the starter strip is level prior to fastening to the substrate.
For inside and outside wall corners: cut the starter strip, leaving a ¼” gap
between the end of the starter strip and the end of the wall corner.
For exterior projects, ProPanel stone veneer should be installed with the local
code requirements for offset above grade.
Ensure outer layer of weather resistant barrier (WRB) is positively flashed/layered
over top of starter strip according to WRB manufacturer’s instructions.
STEP 2: INSTALL CORNER PIECES (see Fig. 2)
Lay out your ProPanel corners, pulling from your blended stone pieces, to ensure
a natural and color varied look.
Starting with the outside corners at the starter strip, install the first corner by
bending the bottom clips up and fitting the stone snug against the bottom of
the starter strip.
ProPanel corners are reversible, and can be installed in either direction.
Offset corner legs 3/8” off wall to allow for movement.
Install corners vertically on the wall, tucking the bottom of the clips behind the
stone below and attaching screws in all visible eyelets.
For inside corners, we recommend cutting the stair step edge to make a flat edge
and kitting (i.e. weaving the ends together up the wall).
BLEND STONE PIECES
Before you begin installation, lay out sufficient corner stone pieces and flat stone pieces to ensure a natural
look and color blend.
HOW TO CUT PROPANEL PIECES
Cut ProPanels pieces both horizontally and vertically with a chop saw, wet saw with a masonry blade, or
hand grinder with a masonry blade.
ProPanel flats shall not be cut shorter than 6 inches and have less than two points of attachment via
original eyelets at the top of the stone.
FOR EXTERIOR WALL PREPARATION
Install ProPanel over 7/16” or greater OSB or plywood sheathing attached to a structural member (wood,
metal studs, concrete or CMU) as specified in IAPMO UER-383.
Install code compliant WRB according to the project documents, local code requirements, and the WRB
manufacturers recommended installation practices.
FOR INTERIOR WALL PREPARATION
For interior applications, ProPanel shall be installed over a minimum 7/16” plywood or OSB (see installation
instructions above). DO NOT INSTALL PROPANEL DIRECTLY TO DRYWALL.
For interior applications, the application of a WRB may not be required, consult job specifications.
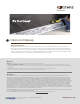
ProPanel Installation Steps
Before You Begin
page 2
Fig. 1
Fig. 2
ProPanel