
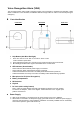
Installation Instructions


2
When powered by Type C batteries, VRA will transmit any detected low battery status along with
regular status signal transmissions to the Control Panel for display accordingly.
When changing batteries, please remove the back cover by unscrewing the bottom fixing screw,
and then inserting a flat-head screwdriver to lift the back cover. Remove the old batteries, and then
press the Help Button twice to fully discharge before inserting new batteries.
Supervision Signal
After learned into the Control Panel, VRA will automatically transmit Supervision Signals every 30 to
50 minutes.
If the Control Panel has not received the supervision signal from VRA for a preset period of time, the
Control Panel will indicate that the Voice Recognition Alarm is out-of-signal range or is out of order.
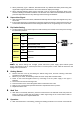
Dip Switch Setting
The Dip Switches can be used to adjust the VRA sensitivity level. Please use a sharp tool to change
the DIP Switch positions
.
<NOTE>
After Dip Switch settings are changed, please disconnect power supply (both external power
supply and batteries must be removed) and then re-connect power to VRA. VRA will work with new
settings after re-powered on.
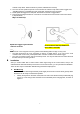
Getting Started
Remove the back cover by unscrewing the bottom fixing screw, and then inserting a flat-head
screwdriver to lift the back cover.
Based on your needs, set Sensitivity Switch as shown in Dip Switch Position Table.
Power on the Voice Recognition Alarm by connecting to 5V DC power supply or two Type C
batteries.
Put the Control Panel into learning mode
Press the button on the Voice Recognition Alarm to transmit a learn code.
Refer to your Control Panel’s operation manual to complete the learn-in process.
Replace the back cover.
Walk Test
After VRA is successfully learned in, place the Control Panel in the walk test mode, then press the
button on VRA to confirm that this location is within signal range of the Control Panel. Refer to
Control Panel manual to complete Walk Test.
Operation
After VRA is learned in successfully, pressing and holding the button for more than 2 seconds will
DIP Position Function
Switch1
ON
Reserved
OFF
Switch2
ON High Sensitivity Level
OFF Low Sensitivity Level (default)
Switch3
ON
Reserved
OFF
Switch4
ON
Reserved
OFF