
Installation Instructions
Disarm confirm beep: set the volume of the confirm beep sound of the Siren when Control Panel is put into Disarm Mode.
Exit beeps of full arm: set exit countdown beep volume under Full Arm Mode.
Exit beeps of home arm: set exit countdown beep volume under Home Arm Mode.
Entry beeps of full arm: set entry countdown beep volume under Full Arm Mode.
Entry beeps of home arm: set entry countdown beep volume under Home Arm Mode.
Door Chime: set the volume of the Door Chime sound (Ding-Dong Sound).
Behavior
Burglar trigger in home arm: Enable or Disable whether Siren is activated when an alarm is triggered under Home Arm.
Burglar trigger in full arm: Enable or Disable whether Siren is activated when an alarm is triggered under Full Arm.
Strobe activation: Enable or Disable Siren LED strobe activation.
Confirm flash: Enable or Disable Siren LED flash when system Armed/Disarmed.
Exit flash: Enable or Disable Siren LED flash during an exit countdown period.
Entry flash: Enable or Disable Siren LED flash during an entry countdown period.
Trigger flash: Enable or Disable the flashing from the Siren LED when alarming.
Alarm-in-memory sound: Enable or Disable Alarm in Memory sound.
Fault sound: Enable or Disable system fault sounds.
Installation
Proceed to installation after complete learning.
Step 1. Disable the Siren Tamper function on the Control Panel (please refer to the Control Panel instruction manual). The Siren will sound a
beep to indicate the tamper switch is now disabled.
<NOTE>
The siren tamper can be turned off temporarily for 1 hour, refer to Control Panel instruction manual for further setup. The siren tamper
will be turned on automatically after 1 hour in case users forget to turn it on.
Step 2. Find the location where the Siren is to be mounted.
Step 3. Remove the Top cover by releasing the bottom screw using a Phillips screwdriver and remove the top cover.
Step 4. Hold the Siren at the position where it will be mounted.
Step 5. Check whether BX has a strong enough signal with the Control Panel by putting the Control Panel into Walk Test mode (please refer to
Control Panel manual). Press the Learn Button to check whether the signal is strong enough (please refer to Control Panel manual for
signal strength).
Step 6. If you are satisfied with the signal strength, you can proceed to mounting the Siren.
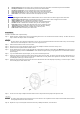
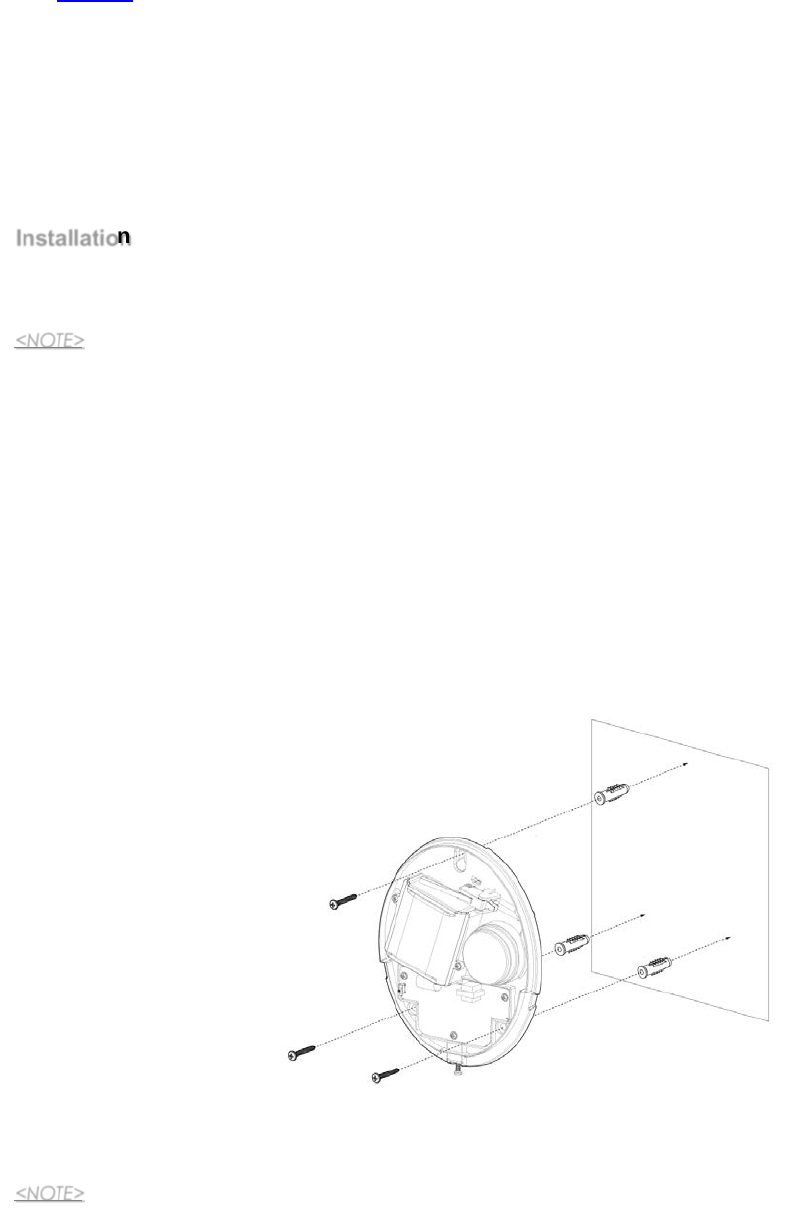
Step 7. Identify the upside down keyhole mounting hole located at upper part of the Siren. The hole is larger than the slot, which allows you to
easily slip the hole over the head of the screw and then slide down to securely hold the Siren against the wall. Drill one hole and insert
one wall plug if required (a), as shown in Figure 1.
Step 8. Identify the two mounting holes at lower part of the Siren. Drill two holes and insert wall plugs if required (b), as shown in Figure 1. Make
sure the wall plugs are flush with the wall.
Figure 1
Step 9. Secure the screw using a Phillips screwdriver. Make sure the Tamper Switch is fully depressed against the wall
<NOTE>
The tamper switch protrudes through the back of the unit. When the siren is pulled off from the wall, the alarm will be activated. Ensure
it is fully depressed when the siren is mounted.
Step 10. Replace the Top cover and tighten the bottom screw using a Phillips screwdriver, as shown below.
3