
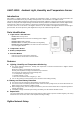
User's Manual


2
ZigBee Device Guideline
ZigBee is a wireless communication protocol that is reliable and has low power consumption and high transmission
efficiency. Based on the IEEE802.15.4 standard, ZigBee allows a large amount of devices to be included in a network
and coordinated for data exchange and signal transmission.
Due to the fundamental structure of ZigBee network, ZigBee device will actively seek and join network after powering
on. Since performing a task in connecting network may consume some power, it is required to follow the instructions to
avoid draining battery of a ZigBee device
- Ensure your ZigBee network router or coordinator is powered on before inserting battery into the ZigBee device.
- Ensure the ZigBee network router or coordinator is powered on and within range while a ZigBee device is in use.
- Do not remove a ZigBee device from the ZigBee network router or coordinator without removing the battery from a
ZigBee device.
Joining the ZigBee Network
As a ZigBee device, the sensor needs to join a ZigBee network to transmit signal. Please follow the steps below to join
the sensor into the ZigBee network.
1. Detach the Top Cover and Base assembly and insert battery.
2. Press and hold the function button for 10 seconds as the sensor resets (LED flashes once) and starts searching for
existing ZigBee network. Please make sure the permit-to-join feature on the router or coordinator of your ZigBee
network is enabled.
3. If the sensor successfully joins a ZigBee network, the LED Indicator will flash twice to confirm.
4. After joining the ZigBee network, the sensor will be registered in the network automatically. Please check your
ZigBee coordinator, system control panel or CIE (Control and Indicating Equipment) to confirm if joining and
registration is successful.
5. After joining the ZigBee network, if the sensor loses connection with current ZigBee network, the LED will flash
every 20 minutes to indicate. Please check your ZigBee network condition and sensor signal range to correct the
situation.
Removing Device from ZigBee Network (Factory Reset)
To remove the Power Switch from current ZigBee network, the sensor must be put to Factory Reset to complete
device removal. Factory Reset function will clear the device of its stored setting information and prompt the sensor to
search for new ZigBee network.
Before removing device, make sure the sensor is within current ZigBee network signal range
1. Press and hold the function button for 10 seconds, then release the button to reset sensor.
2. Upon reset, the sensoe will clear current ZigBee network setting and transmit signal to ZigBee coordinator to
remove itself from current ZigBee network. It will then actively search for available ZigBee network again and join
the network automatically.
Installation
Mounting the Sensor
The sensor can be mounted using two methods: Self-adhesive or Screw mounting.
Self adhesive mounting
1. Clean the surface with a suitable degreaser.
2. Remove the protective covering from one side of double-sided adhesive pad and firmly apply to the back of the
device.
3. Remove the other covering and firmly place/press the device in the desired location.
Do not use the Self-adhesive mounting method on poorly painted and/or rough surfaces.
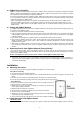
Screw Mounting
The base of the sensor has two screw knockouts, where the plastic is thinner for
mounting purposes. To mount the sensor:
1. Detach the Top Cover and Base assembly by loosening the Cover-Fixing
Screw using a Philips screwdriver.
2. Break through the knockouts on the base.
3. Use the holes as a template to drill two holes and insert the wall plugs.
4. Screw the base into the wall plugs.
5. Replace the top cover over the base by hooking the base onto the fixing hook
and pushing the cover towards the base.
6. Secure and screw the top cover back on to its base using a Philips screwdriver.
Using the Sensor with ZigBee Router
IMPORTANT NOTE
If the sensor installation location is away from your system control panel and requires ZigBee routers to improve