
Getting Started Guide
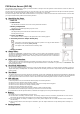


Installation
Decide on the location of the PIR if it is to be horizontal / vertical or ceiling mounted.
After the installation site is selected, follow the steps described above to mount the PIR.
Press the Test Button to enter Test Mode. Walk around the protected area noting when the LED lights up and check that the
detection coverage is adequate.
When detection coverage is found to be satisfying, installation is now completed.
Installation Recommendations
<IMPORTANT NOTE>
When deciding on the height of the PIR mounting site, remember to take the possible blind spot into consideration. The blind spot
underneath the PIR enlarges proportionally to the height of the PIR mounting site.
Please note that performance is affected by external factors, such as height of detected object, desired detection range,
installation area…etc. The suggested mounting height could be adjusted according to actual installation environment factors.
In a position such that an intruder would normally move across the PIR’s field of view from side to side.
Where its field of view will not be obstructed e.g. by curtains, ornaments etc.
Limitations
Do not position a PIR to look directly at a door protected by a Door Contact, this could cause the Door Contact and PIR radio
signals to be transmitted at the same instant when entering, canceling each other out.
Do not install the PIR completely exposed to direct sunlight.
Avoid installing the PIR in areas where devices may cause rapid change of temperature in the detection area, i.e. air conditioner,
heaters, etc.
Avoid large obstacles in the detection area.
Not pointing directly at sources of heat e.g. fires or boilers, and not above radiators.
Avoid moving objects in the detection area i.e. curtain, wall hanging etc.
3