
Getting Started Guide
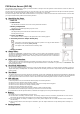


Pull out the battery insulator to activate battery.
The LED indicator will flash for 30 seconds. (The PIR is warming up). During the warm up period, the PIR will not be activated. It is
recommended that you stay away from the detection area during this time. After the warm up period is over, the LED will turn off and
the PIR will be ready for operation.
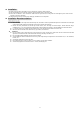
Put the Control Panel into learning mode, refer to Control Panel manual for detail.
Press the test button.
Refer to Control Panel manual to complete the learn-in process.
After the PIR is learnt-in, put the Control Panel into “Walk Test” mode, hold the PIR in the desired location, and press the Test
button to confirm this location is within signal range of the Control Panel, refer to Control Panel manual to complete Walk Test.
When you are satisfied that the PIR work in the chosen location, you can proceed to mounting.
PIR Detection Coverage
When mounted vertically, the PIR has a horizontal detection coverage of 10° and vertical detection coverage of 110° to the front.
The PIR will only be activated by movements across the 10° horizontal coverage.
The PIR can be mounted vertically, horizontally on the wall surface or on the ceiling. Different mounting methods provide different
PIR detection coverage and range (Please refer to Mounting Methods below for details).
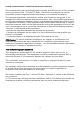
Mounting Methods
The PIR is designed to be mounted on either a flat surface on a wall or on a ceiling with fixing screws and plugs provided.
If the mounted PIR is forcedly removed, the Tamper Breakaway Area will be left on the wall separated from the PIR, the tamper will
then be triggered.
The base has two knockouts, where the plastic is thinner and can be broken for mounting purpose.
I. Remove the fixing screw and cover assembly.
II. Break through the knockouts on the inside of base.
III. Using the holes as a template, drill holes in the surface.
IV. Insert the wall plugs if fixing it into plaster or brick.
V. Screw the base into the wall plugs.
VI. Screw the cover onto the base.
There are different mounting methods including vertical/horizontal and ceiling mountings, and each of them has different application.
Please refer to the below mounting methods.
Vertical Wall Mount:
The PIR is designed to give a typical detection range of 10 meters when mounted at 1.4
meters to 1.6 meters above the ground vertically.
Avoid mounting over 1.7 meters, otherwise the PIR detection range maybe affected.
Horizontal Wall Mount:
When mounted horizontally, the PIR has a detection range of 5 meters against vertically
movement only. It will NOT be able to detect horizontal movement. This practice is
usually used to protect intruder from sky light or roof hatch.
Avoid mounting below 2.2 meters, which may affect detection performance.
Vertical
Horizontal
Ceiling Mount:
Mount the PIR on ceiling to look downward over a door or window.
When mounted at 2.4~3 meter height and looking down, the PIR has coverage of about 5 meters at ground level.
Avoid mounting over 4 meters, which may affect detection performance.
2