FLAME HEATER MODEL NUMBER: PH08-SB, PH08-SSB WARNING: Cancer and Reproductive Harm -www.P65Warnings.ca.gov. FOR OUTDOOR USE ONLY. KEEP THESE INSTRUCTIONS FOR FUTURE REFERENCE.
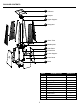
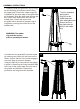
PACKAGE CONTENTS A Reflector B Damper C Upper Support D Wireguard E Glass Tube F Middle plate G Side Panel K Control box H Lower Support I Front Panel J Base PART A B C D E F G H I J K 2 DESCRIPTION Reflector Damper Upper Support Wireguard Glass Tube Middle plate Side Panel Lower Support Front Panel Base Control box QUANTITY 1 1 4 4 1 1 3 4 1 1 1
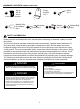
HARDWARE CONTENTS (shown actual size) Screw M3/16 AA attach to the regarding parts DD Fixing Bracket Qty. 4 BB Stability Ring EE (if avalable) Qty.1 AA battery FF Qty.1 Knob Qty. 1 CC Wheels GG Qty.1 set Rubber Ring Qty.1 SAFETY INFORMATION Please read and understand this entire manual before attempting to assemble, operate or install the product. This manual contains important information about the assembly, operation and maintenance of this patio heater.
SAFETY INFORMATION DANGER DANGER • EXPLOSION - FIRE HAZARD • Keep solid combustibles, such as building materials, paper or cardboard, a safe distance away from the heater as recommended by the instructions. • Provide adequate clearances around air openings into the combustion chamber. • Never use the heater in spaces which do or may contain volatile or airborne combustibles, or products such as gasoline, solvents, paint thinner, dust particles or unknown chemicals.
SAFETY INFORMATION WARNING WARNING This product can expose you to chemicalsincluding Lead and Lead Compounds, which are known to the state of Californiato cause cancer, and Carbon Monoxide, Lead and Lead Compounds which are knownto the state of California to cause birth defects or other reproductive harm.For more information go to www.P65Warnings.ca.gov. • This product is fueled by propane gas. Propane gas is invisible, odorless, and flammable.
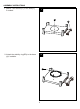
ASSEMBLY INSTRUCTIONS 1. Attach 1 set wheels(FF) to the base(J), if needed. 1 J 2 2. Attach the stability ring(DD) to the base (J),if avalable.
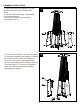
ASSEMBLY INSTRUCTIONS 3. Unsrew any pre installed (M3/16) screws(AA) first. Assemble the four lower supports (H) to the base (J) and middle plate(F)using the (M3/16) screws (AA). 3 H AA J 4. Unsrew any pre installed (M3/16) screws(AA) first. Assemble the four upper supports (C) to the lower supports (H) using the (M3/16) screws (AA). The damper (B) is then assembled to the upper supports (C) using the (M3/16) screws (AA).
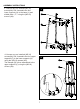
ASSEMBLY INSTRUCTIONS 5. Unscrew(M3/16) 4pcs screws from the bottom of the middle plate(F). Install an AA battery(EE) into the control box. Assemble the control box(K) onto the bottom of middle plate using the (M3/16) screws. Note : The control knob is to face to the front of the heater where the magnet is installed in the middle plate. 5 K 6 6. Unscrew screws(M3/16) from the top of damper(B) Assemble the reflector (A) onto the damper (B) using the (M3/16) screws.
ASSEMBLY INSTRUCTIONS 7. Carefully install the glass tube (E) by lifting up and inserting through the center hole in the upper plate. Ensure the rubber ring(GG) is attached to the lower edge of the glass tube as illustrated. Slide the glass tube through the hole of the lower plate cover and onto the middle plate. Check and ensure that the glass tube is positioned properly and is completely covering the center hole of the middle plate.
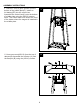
ASSEMBLY INSTRUCTIONS 9. Attach the three side panels (G) to the heater using the (M3/16) screws (AA). Note : 1. M3/16 screws from Step 3 unscrewed from lower supports. 2.Do not cover the front side where the control knob is. 9 G 10. Screw the knob (CC) onto the front panel (I). Attach the panel to the heater by inserting the two tabs into the slots on the base (J). Hook the chain (which is preassembled onto the front panel) into the hole in the front of the control box.
ASSEMBLY INSTRUCTIONS 11. Propane Only-Proper Hose Connection. WARNING! Ensure the hose does not contact any high temperature surfaces, or it may melt and leak causing a fire. 11 12. Connect hose and regulator to cylinder. The propane gas and cylinder are sold separately. Use a standard 20 lb. propane cylinder only. Use this heater only with a propane vapor withdrawal supply system. See chapter 12 of the standard for storage and handling of liquefied petroleum gas, ANSI/NFPA 58.
ASSEMBLY INSTRUCTIONS A dented, rusted or damaged propane cylinder may be hazardous and should be checked by your cylinder supplier. Never use a propane cylinder with a damaged valve connection. The propane cylinder must be constructed and marked in accordance with the specifications for LP gas cylinders of the U.S. Department of Transportation (DOT) or the standard for cylinders, spheres and tubes for transportation of dangerous goods and commission, CAN/CSA-B339.
OPERATION INSTRUCTIONS Leak Check WARNING • Perform all leak tests outdoors. • Extinguish all open flames. • NEVER leak test when smoking. • Do not use the heater until all connections have been leak tested and do not leak. Hose / Regulator connection Regulator / Cylinder connection 1. Make 2-3 oz. of leak check solution (one part liquid dishwashing detergent and three parts water). 2. Apply several drops of solution where hose attaches to regulator. 3.
OPERATION INSTRUCTIONS DANGER • CARBON MONOXIDE HAZARD • For outdoor use only. Never use inside house, or other unventilated or enclosed areas. This heater consumes air (oxygen). Do not use in unventilated or enclosed areas to avoid endangering your life. Caution: Do not attempt to operate until you have read and understand all General Safety Information in this manual and all assembly is complete and leak checks have been performed. Before Turning Gas Supply ON: 1.
OPERATION INSTRUCTIONS 5.For maximum heat turn control knob to ‘HIGH’. 6.To turn heater off, turn control knob to ‘OFF’. 7.Close the vlave of the gas cylinder or the regulator after use. HI OFF CLEANING AND MAINTENANCE: LO To enjoy outstanding performance of your heater for years make sure to perform the following maintenance activities on a regular basis: OFF ● Keep exterior surfaces clean. - Use warm soapy water for cleaning. Never use flammable, LIGHT corrosive or abrasive cleaners.
OPERATION INSTRUCTIONS WARNING NOTE FOR YOUR SAFETY: ● DO NOT touch or move heater for at Least 45 minutes after use. ● Allow all burner elements to cool before Touching. In a salt-air environment (such as near an Ocean) corrosion occurs more quickly than normal. ● Frequently check for corroded areas and Repair them promptly. ● Wait until heater is cool before covering.