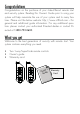
Congratulations Congratulations on the purchase of your state-of-the-art remote start and security system. Reading this Owner’s Guide prior to using your system will help maximize the use of your system and its many features. Please visit the below website: http://www.clifford.com – For general and additional guide information. For any additional questions please contact your authorized Directed dealer or contact Directed at 1-800-753-0600.
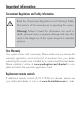
Important information Government Regulations and Safety information Read the Government Regulations and Warning! Safety First sections of this manual prior to operating this system. Warning! Failure to heed this information can result in death, personal injury or property damage and may also result in the illegal use of the system beyond its intended purpose. Your Warranty Your system comes with a warranty.
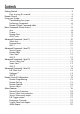
Contents Getting Started.................................................................................................... 3 Keys to using this manual...................................................................... 3 Remote Control ................................................................................................... 4 Using your System ............................................................................................... 6 Commanding the system ................................
Nuisance Prevention (NPC) ................................................................. 20 Remote Start Features ........................................................................................ 21 Pit Stop Mode ................................................................................... 21 Key Takeover..................................................................................... 21 Remote Start Safe-lock ........................................................................
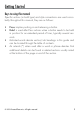
Getting Started Keys to using this manual Specific actions (in bold type) and style conventions are used consistently throughout this manual, they are as follows: s s s s Press: implies pushing in and releasing a button. Hold: is used after Press actions when a button needs to be held in position for an extended period of time, typically several seconds. Italicized words denote section/sub headings in this guide and can be located through the table of contents.
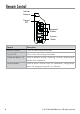
Remote Control Internal Antenna Transmit LED Command Buttons AUX Function Button 4 Feature Description Internal Antenna Used for transmitting information Transmit LED Active when transmitting information Command buttons (4) Used to perform arming, disarming, auxiliary channel and remote start commands Function button Used to access function levels for commands, configuration menus for programming and Car Selection © 2010 Directed Electronics. All rights reserved.
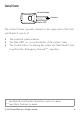
Control Center Control button Antenna Status LED The Control Center, typically located on the upper part of the front windshield. It consists of: s s s The In-vehicle system antenna. The Status LED, as a visual indicator of the system’s status. The Control button, for placing the system into Valet Mode* and to perform the Emergency Override** operation. * See Remote and System Operations section for details. ** See Alarm Features for details. © 2010 Directed Electronics. All rights reserved.
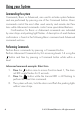
Using your System Commanding the system Commands, Basic or Advanced, are used to activate system features and are performed by pressing one of the Command buttons. Basic commands control the most often used security and remote start features while Advanced commands control more specialized features. Confirmations for Basic or Advanced commands are indicated by siren chirps and parking light flashes.
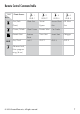
Remote Control Command table Level Direct Access Button x1 LEVEL 1 Arm/Lock Silent Arm (Panic) x2 LEVEL 2 x3 LEVEL 3 x4 LEVEL 4 Sensor Sensor Silent Full Silent Bypass Arm Arm Disarm/Unlock Silent Disarm Remote Valet Car Finder Remote Start Runtime Timer Start Smart Start Defogger AUX 2 AUX 3 AUX 4 Reset AUX Aux/Trunk AUX 1 Advance Level, Enter programming (8 sec) © 2010 Directed Electronics. All rights reserved.
Basic Commands (Direct Access) Arm Press and release The alarm arms, doors lock (if connected), and the siren chirps and parking lights flash once. If Valet mode* is On, the doors lock without siren chirps, the alarm is disabled. Exit Valet mode to arm the alarm normally. If a trigger zone fault is detected the siren chirps once again and the control center LED generates a Trigger Zone Fault report**.
Remote Start Press and release Activates (or if On, deactivates) the remote starter. The engine and parking lights turn On, or the engine and parking lights turn Off accordingly. If a Remote start configuration issue prevents the engine from starting, the parking lights flash a Remote Start fault report*** to identify the fault. AUX/Trunk Press and hold AUX The Trunk opens (if connected) when this button is pressed for 2 seconds. * See Remote and System Operations for details.
Advanced Commands: (Level 1) Press and release the button 1 time. The transmit LED illuminates in sets of single flashes to indicate Level 1. Silent Arm Press and release The alarm arms, doors lock (if connected), and the parking lights flash once. Silent Disarm Press and release The alarm disarms, doors unlock (if connected), and the parking lights flash twice.
Advanced Commands: (Level 2) Press and release the button 2 times. The transmit LED illuminates in sets of double flashes to indicate Level 2. Sensor Bypass Press and release Performing the Sensor Bypass command will incrementally bypass sensor operations and be confirmed as follows: s Warn-away bypass: The Parking lights flash 2 times. Sensors will be activated for Full Trigger levels of impact only. s Warn-away & Full trigger bypass: The Parking lights flash 3 times.
Timer Start* Press and release Activates (or if On, deactivates) Timer Start. The parking lights flash quickly four times for On and slowly four times for Off. Note System needs to be armed or Timer Start will not start the engine. AUX 2 Press and release AUX Activates (or if On, deactivates) the Aux 2 output. * See Advanced Start under Remote Start Features for more details. 12 © 2010 Directed Electronics. All rights reserved.
Advanced Commands: (Level 3) Press and release the button 3 times. The transmit LED illuminates in sets of triple flashes to indicate Level 3. Sensor Silent Arm* Press and release The alarm arms, doors lock, and the siren chirps and parking lights flash 3 times. Car finder Press and release The siren emits one long chirp and the parking lights flash for 10 seconds. The parking light flashes stop if armed or disarmed while Car Finder is in progress.
Advanced Commands: (Level 4) Press and release the button 4 times. The transmit LED illuminates in sets of quadruple flashes to indicate Level 4. Full Silent Arm* Press and release The alarm arms, doors lock, and the siren chirps and parking lights flash 4 times. Defogger** Press and release Activates the vehicle Defogger circuit (if connected) while Remote Start is activated and the parking lights flash 3 times.
Remote Control Configuration Remote Programming The remote controls have operations that can be configured to a user’s personal preferences. The following instruction will direct you through the available programming options for both remote controls. Enter programming, press and hold the button for 8 seconds, the transmit LED turns on to indicate the Main Menu is accessed. Exit programming or go back to a previous menu, press and release the button. When programming is exited the transmit LED turns off.
Prepare the remote control for pairing: 6. Enter programming to access the Main Menu 7. Press and hold the button for 1 second, 3 transmit LED flashes indicate the remote control is ready to pair. 8. Press the button, The siren will chirp to confirm the system has learned the remote control. Remote Features From the main menu, press the button to access the remote operation features, 2 transmit LED flashes indicate the remote features menu is accessed.
To unlock the buttons, press the button. Note button followed by the When the Keypad is locked, the remote control may appear to be non-operational. It will not transmit a command or illuminate the Transmit LED and needs to be unlocked to resume normal operation. Car 2 Options: Off, On The remote controls can control two systems independently. When set to Off, the Car Select feature is not available. When set to On the Car Select feature is enabled.
Alarm Features Normal Arm Protection Status LED: The Control Center Status LED flashes as a visual indicator that your vehicle’s security system is active. Starter Kill: The Failsafe starter kill relay prevents the engine from starting Note May require additional parts and installation Sensor triggers: The onboard shock sensor can distinguish minor impacts from major impacts to the vehicle exterior. Minor impacts causes the system to emit a Warn-away output.
Sensor Warn-away output When the system sensors detect a Warn-away trigger the siren chirps and parking lights flash for 3 seconds. Full Trigger output An alarm Full Trigger will sound the siren and flash the parking lights for 30 seconds. Emergency Override The following procedure disarms the system when a programmed remote is not available. Number of presses__________ 1. Turn the ignition On. 2. Press the control button on the Control Center the correct number of times (the default is 1 press). 3.
Alarm Report If the alarm was triggered while armed, it will be reported when the alarm is disarmed via siren chirps, parking light and control center LED flashes. The siren chirps 4 times (or 5 times if NPC On*), the parking lights flash 3 times, and the control center LED flashes in groups to indicate the last two zones that were triggered (see Table of Zones). The report output will repeat for each disarm operation until the ignition is turned on. * See Nuisance Prevention (NPC) for more details.
Remote Start Features Pit Stop Mode To exit vehicle with engine running The system keeps the engine running during short trips into the house or convenience store. To perform Pit Stop: 1. 2. 3. 4. With the engine running, set the parking brake and release the foot brake. Press the button, the parking lights will turn on to indicate remote start is on. Turn the key to off, and remove it from the ignition, the engine continues running for the programmed runtime. Exit the vehicle and arm the alarm.
Remote Start Safe-lock Remote start safe-lock makes sure the doors are locked while the engine is running and after, even if they are unlocked when remote start is activated. Door locks may require additional parts and labor. Disabling Remote Start Remote start can be disabled by moving the Toggle Switch to the Off position. If remote start is attempted while Off, the engine will not start.
by the installer (default 6 starts). Timer Start is exited after the final start. Smart Start operation Smart Start uses the settings for Timer Start in addition to temperature and battery level to automatically start the engine. Activation begins the countdown timer. When the timer expires the vehicle interior temperature and battery level is checked and, if the Temperature is above 100F, below 0F, or the battery level is below 10.5v, the engine will start.
4. 5. 6. 7. button on the remote, after 20 seconds return to Step 2 (For Turbo Timer Mode, press the optional dash mounted activation button or send the Timer Mode command. The parking lights flash 5 times to confirm MTS mode is enabled and the remote start activates the ignition outputs. Turn Off and remove the key from the ignition switch, the engine remains running. Exit the vehicle, close all the doors and arm the system. The engine turns off.
Remote Start Faults For user safety, the system must be properly configured or remote start will not activate. A Remote Start Fault may be caused by any of several configuration issues. Refer to the table below for the command type and parking light flashes that will identify the configuration issue and solution.
Remote and System Operations Passive Arming* Park and exit the vehicle, after the doors are closed the Passive arming countdown begins. The led flashes quickly and upon reaching 20 seconds the siren then chirps once. At 30 seconds the system arms itself. Anytime before the system arms you can re-enter the vehicle or open the trunk to load or unload items and, after closing passive arming resumes.
Valet Mode Valet mode can be entered and exited by performing the Remote Valet command or manually using the vehicle key and the control button. When entered, the alarm functions are defeated while the convenience features still operate normally. Use 1. 2. 3. the following steps to manually enter and exit Valet Mode: Turn the ignition switch On and then Off Immediately press and release the control button once The control center LED turns On when entering and Off when exiting.
System Expansion Options Controlling two vehicles (Car Select) The remote controls can control systems in two different vehicles saving the need for multiple remote controls. This feature also allows for customized system configurations on each vehicle that has more than one driver. See Owner Recognition for details. Owner recognition * The system can be configured to recognize the remote used when disarming and change selected features to match the remote users preferences.
Battery Information The remote controls are powered by 1 coin cell battery (CR-2032) that can be purchased at most retailers. When the battery begins to weaken, the operating range will be reduced. The information and precautions in this section can help maximize your battery’s life and usage in providing you with many years of trouble free operation. Low Battery Alerts When disarming the system using a remote with a low battery the siren will emit one additional chirp as an alert.
Note 3. Verify that the battery polarity is correct when replacing. With the front and circuit board still turned over, turn back portion of unit onto both parts, reposition all parts and snap together. Battery Disposal Directed Electronics cares about the environment.
Glossary of Terms Document Terminology Control Module The “brain” of your system. Usually hidden underneath the dash area of the vehicle. It houses the microprocessor which monitors your vehicle and controls all of the system’s functions. Remote Control A hand-held, remote control which operates the various functions of your system. Control Center The control center contains the system’s radio-frequency antenna, the control button, and the Status LED.
Government Regulations This device complies with Part 15 of FCC rules. Operation is subject to the following two conditions: (1) This device may not cause harmful interference, and (2) This device must accept any interference received, including interference that may cause undesirable operation. This equipment has been tested and found to comply with the limits for a class B digital device, pursuant to Part 15 of the FCC Rules.
Warning! Safety First Please read the safety warnings below before proceeding. Improper use of the product may be dangerous or illegal. Installation Due to the complexity of this system, installation of this product must only be performed by an authorized Directed dealer. If you have any questions, ask your retailer or contact Directed directly at 1-800-753-0600. Remote Start Capable When properly installed, this system can start the vehicle via a command signal from the remote control transmitter.
Before remote starting a manual transmission vehicle, be sure to: s Leave the vehicle in neutral and be sure no one is standing in front or behind the vehicle. s Only remote start on a flat surface s Have the parking brake fully engaged WARNING! It is the responsibility of the owner to ensure the parking/emergency brake properly functions. Failure to do so can result in personal injury or property damage.
GEAR IS CONTRARY TO ITS INTENDED MODE OF OPERATION. OPERATING THE REMOTE START SYSTEM UNDER THESE CONDITIONS MAY RESULT IN PROPERTY DAMAGE OR PERSONAL INJURY. YOU MUST IMMEDIATELY CEASE THE USE OF THE UNIT AND SEEK THE ASSISTANCE OF AN AUTHORIZED Directed DEALER TO REPAIR OR DISCONNECT THE INSTALLED REMOTE START MODULE. DIRECTED WILL NOT BE HELD RESPONSIBLE OR PAY FOR INSTALLATION OR REINSTALLATION COSTS. This product is designed for fuel injected vehicles only.
Limited lifetime consumer warranty Directed Electronics.
ANY CONSEQUENTIAL DAMAGES OF ANY KIND. IN THE EVENT OF A CLAIM OR A DISPUTE INVOLVING DIRECTED OR ITS SUBSIDIARY, THE VENUE SHALL BE SAN DIEGO COUNTY IN THE STATE OF CALIFORNIA. CALIFORNIA STATE LAWS AND APPLICABLE FEDERAL LAWS SHALL APPLY AND GOVERN THE DISPUTE. THE MAXIMUM RECOVERY UNDER ANY CLAIM AGAINST DIRECTED SHALL BE STRICTLY LIMITED TO THE AUTHORIZED DIRECTED DEALER’S PURCHASE PRICE OF THE UNIT.