
Repair manual


PRESSURE STEAMER OPERATING INSTRUCTIONS
NOTE: These instructions pertain to steamers equipped with self-contained steam generators (boilers). For steamers direct-
connected to a remote (in-house) steam source, disregard those instructions which are directly and solely related to the self-
contained steam generator. These instructions are to be retained by the owner/user for future reference.
1A. Open the cabinet base door and close the drain valve if it is open.
B Make sure the hot and cold water supply valves are open
C. For steamers equipped with a gas-fired steam generator (boiler) follow the lighting instructions noted on the instruction
label displayed on the unit before continuing to instruction in item 2.
2. Flip the toggle switch on from of the cabinet console to "ON". The red console light should then glow and the boiler will
automatically begin filling with water (if it is not already full).
3. After approximately five minutes (after water appears in the sight gauge), depress the "START" reset button on the
console. This will energize the electric healer elements or ignite the gas burners. This cannot be accomplished until the
boiler is full of water.
4 in approximately 15 minutes you will notice the console's steam pressure gauge register 5 pounds. (10 pounds if the boiler
is also supplying steam to a kettle. The upper pressure gauge will register 5 pounds.) You can now preheat the cooking
compartments.
5 Compartments should be preheated before use and should be kept hot between loads. If a kettle and steamer are to be used
at the same time, always heat the kettle unit first. When kettle contents begin to simmer, preheat the steamer
compartments. When pressure on the boiler gauge returns to 10 pounds, cooking may begin in the steamer
6. Close and latch door securely. Turn bar handle clockwise until the door gasket just touches the compartment face
7. Start steam supply by pulling steam valve handle out. If fitted with automatic timer, set timer for 5 minutes. At the start,
compartment thermostatic traps should release air and wet steam for about two minutes, then shut off.
8. Seal compartment door by turning bar handle clockwise just until steam leakage stops. DO NOT OVERTIGHTEN
9. At the completion of the 5 minute preheating cycle, push steam valve slowly in, to avoid boilovers. This shuts off the steam
supply and also depressurizes and drains the compartment. If fitted with an automatic timer, the steam shuts off
automatically and a bell rings when the timer reaches zero. Setting the timer to "Off" stops the bell.
10. To open compartment door, turn bar handle counter-clockwise and delatch.
11. Cooking can now begin by following the above operating steps #6 through #10, but setting the timer tor the required
cooking time. At the end of a cooking cycle 40 minutes long or longer, or when defrosting frozen foods, wait at least two
minutes for the compartments) to depressurize and drain before opening the compartment door.
CAUTION: After each cooking cycle, ensure that all water is draining, and not accumulating in the
compartment. Should a drain become obstructed, it must be cleared before attempting to cook in that
compartment.
12. At the end of each day's operation, flip the console toggle switch to the "Blowdown" position, open the door in the cabinet
base and open the boiler drain valve, (red handle). This "Blowdown" drains the boiler and helps to keep it dean. When the
boiler is empty, flip the console toggle switch to the "OFF" position and dose the boiler drain valve.
13. It is recommended that the boiler be refilled with water after the "Blowdown" is performed. This can be accomplished by
flipping the toggle switch to the "ON" position for a period of five minutes and then returning the switch to the "OFF"
position.
TO PROLONG LIFE AND MINIMIZE SERVICE REQUIREMENTS
1. Blow down the steam generator daily.
2. A periodic boiler inspection must be performed by a qualified serviceman to prolong its life and to minimize service calls.
3. At the end of each day's operation, wash the pan slides, drain screen covers, door gaskets, and compartment interiors with
mild detergent and warm water. Thoroughly rinse with dean water. Rinse water should drain freely through the compartment
drain openings. if it does not the drain must be cleaned before using the steamer.
4. Once a week, flush each compartment drain with a food service equipment drain cleaner and a deliming solution
5. Once every three months, shut off the water supply (hot and cold), and clean the water line strainers.
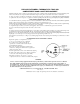
6. Compartment thermostatic traps can be disassembled and cleaned, by hand or in a mechanical dishwasher. This procedure is
recommended if the traps act sluggishly, as they may if contaminated by grease or other film. If cleaning fails to restore the
trap's proper functioning, replace the trap. For more detailed thermostatic trap servicing instructions, refer to Data Sheet
260-LH.
CLEVELAND RANGE, INC., 1333 EAST 179th ST., CLEVELAND, OHIO 44110
Manufacturer reserves right of design improvement or modification, as warranted.
LITHO IN U.S.A. 0388