
Repair manual


Installation Instructions For Steam Generators, Steamers,
Steamer/Kettles: Gas — Electric — Steam Coil
Installation Instructions For All Models
1) These instructions must be retained by the owner/user for future reference. For installation only in noncombustible locations. Gas units
are only to be installed in areas that have provisions for adequate air supply.
2) Position: For proper operation and drainage, steam generator must be level. It must be set near a floor drain. Attach 1 1/2" piping all drain
connections to carry exhaust steam away from the cabinet. Ends of drain lines must vent to atmosphere to avoid back pressure. Allow a
MINIMUM of 6" clearance to the rear and sides of the equipment. The surrounding area must be free and clear of combustibles.
3) Install in accordance with local codes and/or the National Electric Code ANSI/NFPA No. 70-1984. Installation in Canada shall be in
accordance with the Canadian Electric Code CSA Standard C22-1. A unit that is connected to electricity must be grounded. A wiring
diagram is provided inside the relay box.
4) Connect supply lines for 140° — 160° hot water, and cold water, to the unit. Water pressure must be maintained between 35 and 60 psi.
Locations.and presswre data are shown on the connection drawing. Long hot water lines should be at least 1/2" IPS. Flush water supply
lines thoroughly before connecting. Use water which is low in total solids content and low in gas content, to prevent internal scaling,
pitting and corrosion of the steam generator and carry-over of minerals into the steam.Water which is fit to drink can still contain highly
detrimental impurities. Refer to Water Quality Requirements page.
5) Turn on water supply to steam generator. Water valve is inside of base.
6) Connect fuel supply.
FOR YOUR SAFETY
Do not store or use gasoline or other flammable vapors and liquids
in the vicinity of this or are, other appliance.
For Steam Coil Steam Generators —
— Connect steam supply: Location is shown on the connection drawing. Incoming steam pressure must be regulated
between 35 and 45 psi (30 — 45 psi for pressure steamers). Install a Strainer ahead of the regulating valve. Flush line
thoroughly before connecting.
— Connect the outlet end of the steam coil to an inverted bucket trap. Fill trap with water before installing.
— Connect electricity if unit is equipped with electrical controls. Permanent connection is required. Junction box
location is shown on the connection drawing. Unit must be electrically grounded by the installer.
For Gas Fired Generators —
— Post in a prominent location, instructions to be followed in the event the user smells gas. This information shall be
obtained by consulting the local gas supplier.
— Connect gas: Location and pressure data are shown on the connection drawing. Installation shall be in accordance with
local codes, or in the absence of local codes, with the National Fuel Gas Code. ANSI Z223.1 —1984. Installation in Canada
shall be in accordance with Installation Codes for Gas Burning Appliances and Equipment B149.1 and B149.2. Use a gas pipe
joint compound which is resistant to LP gas. Test all pipe joints for leaks with soap and water solution. Allow 12 inch
clearance on right side of all Gas Fired Steam Generator models for servicing gas burners and for proper operation. This 12"
clearance also provides adequate air openings into the combustion chamber. Never obstruct the flow of combustion and
ventilation air. The appliance and its individual shutoff valve must be disconnected from the gas supply piping system during
any pressure testing of that system at test pressures in excess of 1/2 psig (3.45 kPa). The appliance must be isolated from the
gas supply piping system by closing its individual manual shutoff valve during any pressure testing of the gas supply piping
system at test pressure equal to or less than 1/2 psig (3.45 kPa).
— Connect electricity if unit is equipped with electrical controls. Permanent 115V connection is required. Junction box
location is shown on the connection drawing. Unit must be electrically grounded by the installer.
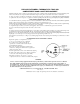
— Lighting and Shutdown Instructions: Rip electrical switch on. Open water valve. Open gas valve. Slightly depress
and turn control knob to "off" for 5 minutes before lighting gas. Turn control knob to "pilot", depress it completely
and light pilot burner. Continue to hold knob in for about 60 seconds, then release. Pilot burner is lighted through
hole in panel at bottom of steam generator. Never leave panel off as this will damage controls. Turn control knob to
"on". Depress electrical "reset" switch for main burner ignition. Burners will not light without water in the steam
generator. For main burner off. with pilot on, turn control knob to "pilot". For main and pilot burner off, slightly
depress and turn control knob to "off". Flip electrical switch off.
For Electrical Steam Generators
— Connect electric power. Location is shown on the connection drawing. Provide connection as required by your unit.
Electric supply must match power requirements specified on data plate attached to base. Wiring must be adequate to carry
required current at rated voltage. A separate fused disconnect must be supplied and installed. Unit must be electrically grounded
by the installer.
CLEVELAND RANGE CO., 1333 EAST 179th ST., CLEVELAND, OHIO 44110
1086 LITHO IN U.S.A. Manufacturer reserves right of design improvement or modification, as warranted.