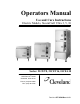
Operators Manual Use and Care Instructions Electric Models, SteamCraft Ultra 3, 5, 10 Series: 21CET8, 21CET16, 24CEA10 1333 East 179th Street Cleveland, Ohio 44110 Phone: (216) 481-4900 Fax: (216) 481 3782 Part No.
FOR THE USER WARNING Improper installation, adjustment, alterations, services or maintenance can cause property damage, injury or death. Read the installation, operating and maintenance instructions thoroughly before installing or servicing this equipment. WARNING Disconnect power before servicing IMPORTANT A QUALIFIED CLEVELAND RANGE TECHNICIAN MUST PERFORM ALL SERVICE. RETAIN THIS MANUAL FOR YOUR REFERENCE You may wish to record the following items for future use.
OPERATOR’S MANUAL Table of Contents Chapter Page SECTION 1: INTRODUCTION ______________________________________________ A. OPERATIONAL SAFETY __________________________________________________ B. PRODUCT INFORMATION ________________________________________________ (1) Serial Number ______________________________________________________ (2) Model Number ______________________________________________________ (3) Product information Plate ______________________________________________ C.
(Table of Contents Continued) SECTION 7: STEAM COOKING GUIDELINES _________________________________ A. INTRODUCTION ________________________________________________________ B. SIZING UP PAN CAPACITY _______________________________________________ (1) Serving Sizes – How Much? How Many? __________________________________ (2) Reference Charts for Typical Pan Capacities _______________________________ C. CONVECTION STEAMER – SUGGESTED TIMER SETTING GUIDELINES ___________ D.
SECTION 1: INTRODUCTION To use a SteamCraft Convection Steamer safely and effectively, each operator must read and understand this Manual completely before starting operation. The owners and operators of the steamer should retain this Manual in an easily accessible location for future reference and training. The owner(s) and operator(s) of the steamer must be aware that steam can cause serious injuries and equipment damage.
(3) Train all personnel who will use the steamer. Make sure personnel know how to operate the steamer, clean the interior and exterior, drain the unit, and descale the steam generator. (4) Operating personnel must be able to recognize problems, and report them so that corrective actions can be taken by trained personnel as outlined in the troubleshooting charts found in the back of this manual and in the separate Installation and Maintenance Manual. (5) Conduct regular steamer inspections.
C.
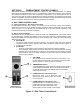
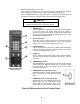
SECTION 2: COMPARTMENT CONTROL PANELS The standard steamer control panel, illustrated in Figure 2-1 has a mechanical timer. An optional electronic keypad timer illustrated in Figure 2-2 of SECTION 2, Part B and an ON/OFF control panel are also available. The Electronic timer uses a temperature compensation circuit, which allows the timer to count down only while the cooking compartment is at cooking temperature.
B. KEYPAD TIMER CONTROL PANEL (1) Cooking Operations – Keypad Control Panel For safe, efficient operation of the steamer, the operator must, at a minimum, comply with all cautions, warnings and instructions in the detailed operating procedures and be familiar with the control panel shown in Figure 2-2. The operator must be familiar with all the operating features explained in this manual before attempting to operate the steamer.
c) Shutting Off Alarm/When Timer is Done When the timer counts down to zero, the alarm sounds continuously, the generator stops steaming, and steam flow to the cooking compartment gradually stops. Press the START/STOP key to silence the alarm. The cooking time display returns to the last time set. Either run this same setting again or clear and reset the timer. CAUTION Press switches with fingertips only. Do not use kitchen utensils or anything sharp to operate the switches.
SECTION 3: GENERAL OPERATION A. EXTERNAL MAIN POWER SWITCH (Junction Box) Usually the kitchen’s external main power switch is left ON. If the external main power switch was left in the OFF position, turn it ON as follows. (1) Check that the water supply valves to the steamer are open. (2) Turn the steamers ON/OFF Switch to the OFF position. The TIMED/MANUAL switch and timer settings are not important in this procedure. The control panel circuits are not powered while the ON/OFF switch is set to OFF.
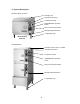
D. INSPECTING THE COOKING COMPARTMENT At the back of the cooking compartment, a drain screen covers the drain. Refer to Figure 3-3. The screen prevents large food particles from entering and blocking the drain line. Any blockage of the drain line or screen can reduce drainage from the cooking compartment resulting in reduced cooking performance, equipment damage, and a hazard to the operator.
SECTION 4: COOKING WITH THE STEAMER WARNING When checking inside the steamer always open the door slowly and stand to the side and back away from the steamer. Water leaking from the door gasket can be a sign of a blocked drain. If the drain is blocked, hot water can accumulate inside the compartment and spill out when the door is opened. A. OPERATING AND COOKING PROCEDURE – TIMED MODE In timed mode, the timer starts and stops the steaming operation.
(8) Carefully open the cooking compartment door, and remove the pans from the slide racks. • If the steamer will be used again in a few minutes shut the door to maintain the cooking compartment temperature. • If another use is not planned for more than half an hour, leave the cooking compartment door slightly open to reduce internal pressure while the steam condenses and the compartment cools.
6. To stop manual mode steaming, press the TIMED (top) end of the TIMED/MANUAL rocker switch. The generator stops steaming, and steam flow to the cooking compartment gradually stops. WARNING SEVERE BURNS may result from exposure to steam. Do not open the steamer door before steam flow stops. Stand back when opening the compartment door. Open the door slightly to allow steam to vent before looking or reaching into cooking compartment. Do not reach into cooking compartment until the steam has cleared.
(3) Blowdown Procedure When the steamer is turned off, its blowdown cycle starts and runs automatically. The complete cycle takes approximately 3 minutes. 1. Turn the ON/OFF Switch to the OFF position to turn off the steamer. The red indicator light in the ON/OFF switch turns off. Do not turn power off at the main power switch during blowdown. 2. Automatically, the drain valve opens and begins to empty water from the steam generator. 3.
(4) Remove any spilled food from inside compartment and clear any residue from the drain screen. Clean the interior of the compartment thoroughly. Use a soft bristle brush to remove stubborn food particles. Do not use abrasive cleaning compounds or steel wool. Rinse inside of steamer compartment with clean water. WARNING Let rinse water drain through compartment drain opening. If water does not drain freely, drain lines must be cleaned before cooking again.
SECTION 6: PREVENTATIVE MAINTENANCE AND TROUBLESHOOTING A. MAINTENANCE Maintenance on the steamer must be performed on a regular basis to keep the unit running properly. By following the maintenance instructions in this Section and in the separate Installation Manual, problems with the steamer will be kept to a minimum. As with any preventative maintenance schedule, the frequency of steamer maintenance may need to be increased, depending on equipment usage and water quality.
(4) Weekly/Monthly Maintenance Descale Steam Generator Steam generators should be descaled at least once a month, depending on scale buildup. Alternately, they can be descaled weekly with smaller amounts of solution, if this frequency better suits your maintenance schedule. If you have serious steam generator scale buildup, a water treatment system should be installed for the steamer or if this is not possible the frequency of descaling should be increased.
Weekly/Monthly Maintenance (continued) ATMOSPHERIC STEAM GENERATOR DESCALING PROCEDURE (For DISSOLVE® Descaler Solution Part No. 106174) 1. This procedure will take approximately 1 hour and 30 minutes to complete. This entire procedure should be read and fully understood, before beginning the actual descaling operation. 2. Zero the timers or for manual only models set the selector to OFF. 3. Open both doors to the cooking compartments. 4. Set the TIMED/MANUAL switches to TIMED. 5.
B. OPERATORS TROUBLESHOOTING GUIDE The Troubleshooting guide includes a list of symptoms that may be encountered during routine operation and maintenance. The first column on the left (PROBLEM) describes these symptoms. The second column lists the possible causes for the problem in column one. The third column lists possible remedies for the problems and causes in columns one and two.
PROBLEM ON/OFF switch light ON but timer does not light. (Electronic Timer Models only). Steam flow does not stop when timer stops. Table 6-1 Trouble Shooting Guide (Continued) POSSIBLE CAUSE REMEDY/REFERENCE Timer transformer has failed. See note #1. Inoperative controls. See note #1. Operating in manual mode. Switch to timed mode for timer to be effective. See note #1. Heat Standby Switch has loosened or failed closed. (21CET16 only) Heat standby timer is stuck closed. See note #1.
PROBLEM Food takes too long to cook. To verify the steamers proper operation, see note #6. Reduced steam flow into cooking compartment Water coming from drain even when not cooking. Descale Required Indicator is lit. Note: Switch does not descale unit, it is just a reminder that steamer must be descaled every 4-6 weeks. Water is flowing out of the steam ports into the cooking compartment ON/OFF switch light on and steamer does not make steam in timed mode.
Table 6-1 Trouble Shooting Guide (Continued) PROBLEM Water comes out of the descale port. POSSIBLE CAUSE Descale cap is missing. Descale cap is loose. Descale cap and/or gasket is damaged. REMEDY/REFERENCE Install the descale cap. The descale port must be closed tightly for the steamer to operate properly. If missing see note #8. Tighten the descale cap. The descale port must be closed tightly for the steamer to operate properly. See note #8. TROUBLESHOOTING NOTES 1.
SECTION 7: STEAM COOKING GUIDELINES A. Introduction: Steam Cooking is an excellent way to prepare countless foods. With large and small quantities you will find cooking to be efficient, economical, fast and convenient. Food can never burn-pans will never boil over-there is no heavy lifting of water in pots-no scouring of containers-no waiting for boiling to start. Steam cooking is efficient, economical and convenient.
B. SIZING UP PAN CAPACITY: (1) Serving Sizes – How Much? How Many? How to estimate portion size and number of servings from a standard steam table pan. • A 12” x 20” x 2½” (65mm-1/1GN) solid pan will hold 1-7/8 gallons or 240 fluid ounces (30 liters or 7200ml).
C. CONVECTION STEAMER – SUGGESTED TIMER SETTING GUIDELINES ELECTRONIC CONTROLS WITH THE COMPENSATING THERMOSTAT Timer settings are approximate due to the differences in food quality, age, shape and the degree of doneness desired. It is not necessary to add water. Perforated pans are recommended. Starred items (*) must be cooked in solid pans. Items marked with two stars (**) require handling in two steps.
(continued from previous page) FRUIT: Fresh Apple, cored 1 Grapefruit 1 Orange 1 Apricot 1 Pineapple, whole 2 Dried: add water to re-hydrate Apple 10 Apricot 10 Peach 10 Pear 10 Prune 10 MEATS & POULTRY: Cook meats and poultry in nested pans, as juices can be used for gravy, sauces, beef stock and soups. The portion size, thickness, grades, should be considered when selecting a timer setting for doneness. POULTRY: Fresh Turkey, whole 6-8 min./lb. Chicken, 5-8 oz. Breaded piece 18-20 min.
D. STEAMING TIPS - LOBSTER - CRAB - SHRIMP (1) Live Lobster and Crabs a. Live lobsters and crabs are steamed according to the time on the Suggested Timer Setting Guide. b. Steam them on a perforated pan with a catch pan (a solid pan) on a lower pan slide. Discard the juices and non-edible matter collected during steaming. (2) Lobster Tail 8 oz. a. To serve in a shell, cut the frozen lobster tail in half, lengthwise. Place the cut side up on a perforated pan.
SECTION 8: LIMITED WARRANTY CLEVELAND RANGE products are warranted to the original purchaser to be free from defects in materials and workmanship under normal use and service for the standard warranty period of one year from date of installation or 18 months from date of shipment, which ever comes first. CLEVELAND RANGE agrees to repair or replace, at its option, f.o.b.