MAX™ IP Response Point™ Users Manual
TECHNICAL SUPPORT Telephone Fax Email Web 1.800.283.5936 1.801.974.3760 1.801.977.0087 tech.support@clearone.com www.clearone.com document title CLEARONE PART NO. 800-158-380 (REVISION 1.0) October 2008 © 2008 ClearOne. All rights reserved. No part of this document may be reproduced in any form or by any means without written permission from ClearOne. ClearOne reserves specific privileges. Information in this document is subject to change without notice.
MAX™ IP Response Point™ 1 Unpack and Setup Keypad Functions Features The LCD Display Using the phone Make a Call Answer a Call End a Call Turn the Ringer On/Off Adjust Ringer Volume Dial an Internal Call 1 1 1 2 2 2 2 2 2 2 3 Using Microsoft® Response Point™ 4 Adding a New Phone 4 Appendix : A - Compliance 7
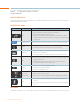
MAX™ IP Response Point™ Users Manual Unpack and Setup Unpacking information and setup instructions for your MAX IP Response Point product are found in the Quick Start Guide and Administrator’s Guide. Keypad Functions Button Name Hook Response Point Function • • • • Press to answer an incoming call. Press to activate the phone and receive a dial-tone. Press again to disconnect an active call.
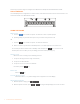
and set up your phone using the Configure Phone Wizard in the Response Point Administrator’s Guide. The LCD Display The LCD display acts as a legend for the various modes, codes and functions of the device. Each function is covered in this manual or the Administrator’s Guide. Using the phone Make a Call 1. Press the key to activate the phone. You will hear a chime or spoken prompt. 2. Speaking clearly, say the name of the person in your Contact List you wish to call. OR 1.
Dial an Internal Call To dial an internal company extension using voice dialing: 1. Press the button on the phone. 2. Say the name of a person in your directory (e.g. “Denise Smith”). You can also speak the name of a specific location or department, such as “kitchen” or “accounts payable,” as long as those extensions are listed in the directory. To dial a call manually (using the keypad:) 1. Dial the extension number (optionally, followed by “#”) of the co-worker or department you wish to contact.
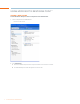
Using Microsoft® Response Point™ Adding a New Phone To add the MAX IP Response Point in Response Point Administrator 1. Launch Response Point Administrator. • Connect to the server. 2. Click Add Phone A. Ensure the MAX IP Response Point is powered and connected to the network. B. The MAX IP Response Point will appear in the device list.
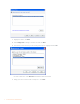
C. Highlight the device, click Next. D. Select Assign User to Assign or Create a user and click Next. E. From the list, choose the user you wish to assign to the phone, highlight and click OK. • To Create a New User: select New User and follow the New User wizard. F. Assign your user to “Recieve calls on this phone”. Click Next.
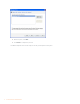
G. Name the phone, click Next. H. Click Finish to complete the process. The MAX IP Response Point is now ready for use with your Response Point system.
Appendix : A - Compliance EUROPEAN COMPLIANCE Conformity of the equipment with the guidelines below is attested by the CE mark. EC Declaration of Conformity Manufacturer’s Name: ClearOne Communications Manufacturer’s Address: Edgewater Corporate Park South Tower 5225 Wiley Post Way, Suite 500 Salt Lake City, Utah 84116 U.S.A. EU Representative Name: ClearOne Communications Ltd.
IEC 60950-1: 2001 Safety of Information Technology Equipment, Including Electrical Business Equipment. RoHS - 2002/95/EC Restrication of the Use of certain Hazardous Substances in Electrical and Electronic Equipment (EEE) & WEEE - 2002/96/EC Waste of Electrical and Electronic Equipment (EEE). We herein certify that the products listed above are in compliance with the EU directive 2002/95/EC and EU directive 2002/96/EC.