RAV 600/900 User Manual ClearOne Communications, Inc.
ii iii RAV — Table of Contents Table of Contents Introduction . . . . . . . . . . . . . . . . . . . . . . . . . . . . . . . . . . . . . . . . . . . . . . . . . . . .1 Warranty information can be found on the ClearOne website. www.clearone.com The RAV 600/900 . . . . . . . . . . . . . . . . . . . . . . . . . . . . . . . . . . . . . . . . . . . . . . . . . . . . . . .2 Product Overview . . . . . . . . . . . . . . . . . . . . . . . . . . . . . . . . . . . . . . . . . . . . . . . . . . . . . . .
Introduction 1
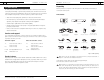
2 Introduction — The RAV 600/900 3 Introduction— The RAV 600/900 Unpacking The RAV 600/900 The RAV product line is the first out-of-the-box room audio conferencing solution with the sound quality and flexibility of a professionally installed system. The RAV includes an audio conferencing mixer that uses distributed acoustical echo-cancelling technology to provide the most intelligible full-duplex audio conference experience possible.
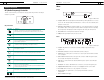
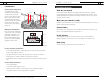
4 Introduction — Product Overview 5 Introduction— Product Overview Mixer Product Overview Front RF (Radio Frequency) Controller The RF controller allows you to manage all calls, program user preferences and adjust settings for your RAV. A MENU ENTER MUTE 1 2 3 ABC DEF 4 5 6 GHI JKL MNO CONFERENCE ON/OFF FLASH REDIAL 7 8 9 PQRS TUV WXYZ * 0 # HELP LINE DOWN DOWN UP VOLUME PAUSE Key Functions LCD Icon ANTENNA SIGNAL BATTERY C B D UP Figure 1.2.
Introduction — Product Overview Microphone Pods 7 Introduction— Basic Room Design Basic Room Design Basic Room Design for RAV To ensure best microphone and loudspeaker placement (ceiling- or wall-mount), please use the following guidelines. For more information on Room Design, or to view the RAV online training course, visit www.clearone.com. A Microphones B Center mic pods on the table at an equal distance apart. Place the controller on the same table as the mics.
8 Introduction — Basic Room Design Loudspeakers Installation Overview Ceiling-mount loudspeakers Read the user manual For best performance, ceiling loudspeakers should be installed directly above the microphone pods. If you have a RAV 900 with three mic pods, install the ceiling loudspeakers above the first and third mic pods. The ceiling speakers must be set to 8 Ohms. Please refer to the Bose user manual for instructions.
10 Introduction — Installation Overview 11 System Requirements for RAV-Ware Component Requirement Operating System and RAM Windows 98 SE Windows 2000 Windows XP Processor 300 MHz Pentium III or better Monitor 1024 x 768 SVGA (16 bit) high color Video Card SVGA 1024 x 768 minimum Free Hard Disk Space 20 MB minimum RS-232 COM port Up to 115,200 baud rate USB port USB 1.1–2.0 Flash Support Macromedia Flash Player 6.
Connecting the RAV 2
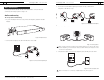
14 Connecting the RAV — Basic Connections 15 Connecting the RAV — Basic Connections 3. Connect the second and third microphone pod using the 12' Cat. 5 cables. (Third microphone on the RAV 900 only). Basic Connections Connecting the RAV should take less than one hour. Once basic connections for audio conferencing are made, the system is ready to use. Audio conferencing To set up audio conferencing 1. If you are installing the mixer into a rack, remove the side panels, rotate them and then reattach.
16 Connecting the RAV — Basic Connections 6. Using an RJ-11 cable (not supplied), connect an analog telephone set to the Set jack on the mixer (optional). 17 Connecting the RAV— Basic Connections 9. Attach the external antenna and turn it it is upright. TELEPHONE RS-232 CAMERA CONTROL TELEPHONE LAN SET RS-232 LINE SET Figure 2.9. Attach external antenna 10. Insert four AAA batteries into the RF controller. Figure 2.6. Connection to network 7. Using the 7' Cat.
18 Connecting the RAV— Auxiliary Devices 19 Connecting the RAV— Auxiliary Devices Auxiliary Devices To connect to a sound card The mixer allows connection to a number of different audio and video peripherals, such as video codecs, VCRs, cameras and computers. 2. Using an RCA cable, connect the Line Out on the RAV mixer to the line in on a sound card. 1. Using an RCA cable, connect the Line In on the RAV mixer to the line out on a sound card.
20 Connecting the RAV — Auxiliary Devices 21 Connecting the RAV— Auxiliary Devices Connecting VCRs and DVD players Connecting for serial control You can record your audio/video conference or play audio using a playback device such as a VCR or DVD player. You can connect a computer or a control device, such as an AMX or Crestron, to the RAV mixer through the serial control port. See the page 78 for a list of the serial commands.
22 Connecting the RAV — Auxiliary Devices 23 Digital phones If you have a digital (PBX) telephone service, you need to run an analog extension from the PBX (recommended for best performance) or use a digital-to-analog telephone line converter. For more information, contact ClearOne Technical Support. Note: If you connect the RAV through a digital-to-analog line converter, you will not be able to use the tabletop controller or the RAV-Ware dialing interface to make calls.
RAV-Ware Software Configuration 3
26 RAV-Ware — Introduction 27 RAV-Ware — Introduction RAV-Ware overview Introduction Getting started with RAV-Ware ™ Please ensure that you have administrative privileges before attempting to install RAV-Ware™ on computers running Windows 2000 or later. You should also review the System Requirements on page 10 to ensure software will run correctly and that you have all the necessary network information.
28 RAV-Ware — Introduction 29 RAV-Ware — Introduction RAV-Ware connections RAV-Ware files When you connect to the RAV unit, RAV-Ware automatically finds all RAV units connected serially or on the same subnetwork and lists them in the Connections pane. You can save current RAV-Ware files, create new files, edit existing files and import files using the menus and toolbar icons. When connected to a RAV unit, any changes made to a RAV-Ware file are updated immediately within the RAV unit.
30 RAV-Ware — Introduction 31 RAV-Ware — Configuring System Settings Network Find Configuring System Settings Network Find allows you to connect to any RAV system on your network using its IP address or a unique network name. Use Network Find to access RAV units not listed in the Connections pane, but which reside on the same network. System settings include Communication, Regional and Telephone settings.
32 RAV-Ware — Configuring System Settings 33 RAV-Ware — Configuring System Settings To change the User Name and Password Regional Settings 1. In the Networking tab, click User/Password. In the Regional Settings window, you can configure the date and time to ensure an accurate time stamp on log files. 2. Specify the User name. (Default is clearone.) 3. Type the Password. (Default is rav.) To open Regional Settings 4. Retype the password to confirm. • 5.
34 RAV-Ware — Configuring System Settings To change telephone preferences Customizing RAV Components 1. In the Preferences tab, set the system to Auto-Answer after 2 Rings or 4 Rings or select Disabled if you want to manually answer calls. Your RAV system is pre-configured for optimal audio quality right out of the box. However, you can customize the audio and adjust the volume to match user preferences.
36 RAV-Ware — Customizing RAV Components 37 RAV-Ware — Customizing RAV Components Loudspeakers Mixer Console You can adjust your Bose loudspeaker equalization, change volume levels and enable ClearEffect in the Loudspeaker window. Equalization in RAV-Ware is similar to the bass and treble adjustments on a stereo. Increasing or decreasing the low, mid and high frequencies and levels allows you to customize loudspeaker audio and provide the optimal listening experience for your users.
38 RAV-Ware — Configuring Auxiliary Devices 39 RAV-Ware — Configuring Auxiliary Devices Adjusting Line Input/Output settings Line Input and Output The RAV mixer has jacks for Line Input and Line Output that allow you to connect different auxiliary devices. You can configure audio levels for these devices through RAV-Ware. You can use devices that have preconfigured audio settings from the Device Toolbox or you can manually set the audio settings for your line in and line out devices.
40 RAV-Ware — Configuring Auxiliary Devices 41 RAV-Ware — Configuring Auxiliary Devices Record and Playback Adjusting Record/Playback settings Record and Playback devices include VCRs, DVD players and sound cards. However, the Playback/Record jacks are line level inputs and outputs and are not restricted to these devices. You can use devices that have preconfigured audio settings from the Device Toolbox or you can manually set the audio settings for your VCRs or DVD players.
42 RAV-Ware — Configuring Auxiliary Devices 43 RAV-Ware — Dialer and Phonebook Usage To test camera presets Camera Controls 1. Select the camera you are testing. The RAV system provides voice tracking capabilities through a VISCA control port connection to a PTZ camera. Setting camera presets 2. Click Run Preset for each mic pod to test the programming. The camera should move to the preset position for each microphone.
44 RAV-Ware— Phonebook and Dialer Usage RAV-Ware — Phonebook and Dialer Usage Dialer To make a call from the phonebook While most calls will be made using the RF controller, you can also manage all your calls from the Dialer in RAV-Ware. You can dial a number, redial the last dialed call and disconnect calls. You can also use flash settings, mute the microphones and adjust loudspeaker volume. 1. Using the mouse, select the number in the phonebook.The name and number appear in the display window.
46 RAV-Ware — Advanced Features 47 RAV-Ware — Advanced Features Advanced Features Event Log RAV-Ware has several advanced features which allow you to perform system checks and administrative functions. The Event Log keeps record of a user-selectable events. You select which events you want recorded and RAV-Ware keeps a log, allowing you to periodically review events and make sure the system is running smoothly. You can also save the Event Log as a .txt file.
RAV-Ware — Advanced Features 48 RAV-Ware — Advanced Features 49 Error Messages Device Toolbox Editor When the RAV system encounters an error, an error icon will appear in the lower left-corner of the screen. Review this log to troubleshoot problems. The Device Toolbox Editor allows you to add your auxiliary devices to RAV-Ware. You can add video codecs, sound cards, record/playback devices and amplifiers to customize your system and easily access these devices for future RAV installations.
Using the RAV 4
52 Using the RAV — Using the Controller To use speed dial Using the Controller • Managing Calls Most phone specific functions, such as dialing a call or adding a phonebook entry, will be managed from the RF controller. Phonebook and dialer actions can be done through RavWare as well. See page 43 for more information. To answer a call • Press on the RF controller to answer the call. When there is an incoming call, the phone rings and the LEDs on the microphones flash.
54 Using the RAV — Programming Phone Preferences Using the Phonebook from the RF Controller Programming Phone Preferences You can manage the Phonebook, adjust phone settings, such as ring melody and tone, and set preferences, such as country codes and language, through the menu options outlined below. You can also program these preferences in the RAV-Ware software. Refer to Chapter 3 for more information on RAV-Ware. Menu Phonebook Settings The Phonebook stores up to 20 names and numbers.
56 Using the RAV — Programming Phone Preferences Adjusting the Settings To activate Auto Disconnect You can activate the auto-answer setting, activate auto-disconnect, select ringer melodies and adjust your ringer in the Settings menu. 1. Press To select a Ring Melody 1. Press to access the menu options. 2. Scroll to Settings and press 3. Press Note: Once you select a melody, you will hear it played through the speakers.
58 Using the RAV — Programming Phone Preferences To select a frequency 1. Press Note: The channel frequency allows the mixer to communicate with the controller. The frequency in RAV-Ware must match the RAV controller frequency. See page 32. to access the menu options. 2. Scroll to Configuration and press 3. Scroll to Frequency and press . . Frequency 1 Frequency 2 Frequency 3 4. Choose a frequency from 1–8. 5. Press to save the frequency and return to the Configuration menu.
60 Using the RAV — Programming Phone Preferences 61 To view the IP address 1. Press to access the menu options. 2. Scroll to Configuration and press 3. Scroll to IP Address and press . . IP Address 191.151.147.102 Exit Note:The IP address for the RAV unit will display on the LCD. Figure 4.21. IP Address 4. Select Exit to return to the Configuration window. To check the RAV version 1. Press to access the menu options. 2. Scroll to Configuration and press . 3. Scroll to Version and press .
Web Interface 5
64 Web Interface — Overview 65 Web Interface — Overview Overview Dial Accessing the web interface You can make all your calls from the Dialer in the web interface. You can dial a number, redial the last dialed call and disconnect calls. You can also use flash settings, mute the microphones and adjust volume. The RAV has a built-in web server that provides a remote access interface to your RAV system. However, not all programming and metering functions are available.
66 Web Interface — Overview 67 Web Interface — Overview To make a call from the Phonebook Event Log 1. Click a number in the Phonebook you want to call. The Event Log keeps record of a user-selectable events. You select the events you want recorded in RAV-Ware. You then can download the log for review in the web interface. Check the Event Log when there are communication errors or for other troubleshooting. The name and number appear in the display window. 2. Click ON/OFF button to dial the call.
68 Web Interface — Overview 69 Web Interface — Overview System Check Log Out The System Checks window allows you to check your RAV system to be sure all parts of your system are connected and working properly. • Click the Log Out button. To open the system checks • Click the System Checks button. Figure 5.6. Log out • Click Yes, Log Out. -OrNo, Go Back to return to the main screen. Figure 5.5. System Checks To run system checks • Click the Start button. RAV checks all components.
Appendix 6
72 Appendix — Maintenance Maintenance 73 Appendix — Troubleshooting Controller Controller doesn't communicate with the mixer Unplug all components before cleaning. Do not use liquid or aerosol cleaners. Use a soft, damp cloth to clean the microphones and controller. If storing for an extended period of time, remove the batteries. Troubleshooting Audio No dial tone Ensure that the RJ-11 cable is connected to an analog line. Make sure the phone cable is connected to the Line jack, not the Set jack.
74 Appendix — Troubleshooting Speakers Neither speakers play Check that the wires are properly connected. Check the audio mixer in RAV-Ware to ensure the audio is routed to the loudspeakers. Bass and treble are weak Check the equalization for the loudspeakers in RAV-Ware.
76 Appendix — Specifications Loudspeaker Specifications Dimensions Dynamic Range: > 65dB Mixer (WxDxH) Line Input 17" x 7.5" x 2" (43.2 cm x 19.1 cm x 5.1 cm) Connection: Unbalanced RCA Gain: -10 dBu nominal, adjustable from -14 dB to +18 dB Nominal Level: -10 dBu Maximum Level: +9 dBu Impedance: > 10 kOhm RF Controller (WxDxH) 10.5" x 4.5" x 2.75" Microphone Pod Diameter 7" (17.8 cm) Height 1.5" (3.8 cm) Weight Mixer 4.5 lb (2.04 kg) RF Controller 2.0 lb (.91 kg) Microphone Pod 1.1 lb (.
78 Appendix — Serial Commands Serial Commands The RAV 600 and RAV 900 accept serial commands through the telnet, RS-232 serial port or USB. The commands in this manual pertain only to the RAV 600 and RAV 900. RS-232 serial port protocol is 9,600, 19,200, 38,400, 57,600 (default) or 115,200 baud; 8 bits, 1 stop bit, no parity. Groups and channels The following tables define the relationship between alpha and numeric representations.
80 Appendix— Serial Commands Meter type definitions 81 Appendix— Serial Commands RAV serial commands Alpha Numeric Level position for Mic Pods Level position for Line Inputs Level position for Outputs Level position for Telco Transmits Level position for Telco Receives A 2 Maximum level of the three microphones on the pod after processing Level after PEQ and gain Level after PEQ and gain Level after gain Level after gain adjustment R 5 Echo Return Loss N/A N/A N/A N/A E 6 Echo R
82 Appendix — Serial Commands 83 Appendix— Serial Commands Command Function AA - Auto Answer Enable/ Disable LABEL LOCALNUM LVL LVLREPORT LVLREPORTEN MANUFACTURER MICCAMPRESET MTRX MUTE NCSEL PBDIAL PHONEBOOKADD PHONEBOOKCNT PHONEBOOKDEL PHONEBOOKREAD REDIAL RESET RFFREQ RING RINGERLVL RINGERSEL RINGERTEST SILENCEPRST SPEEDDIAL STEREOMIX SYSCHECKS TE TELCOLVLCTRL UID VER VOLUME Selects/reports label of specified channel or unit Sets/reports current value of local number Reports in, out or processor
84 Appendix — Serial Commands 85 Appendix— Serial Commands ACONN - Audible Connect / Disconnect Indication AEC - Acoustic Echo Canceller enable/ disable This command selects/reports the status of the audible connect/disconnect indication. This command selects/reports the setting of Acoustic Echo Canceller.
86 Appendix — Serial Commands 87 Appendix— Serial Commands BATTERYLVL - Battery Level CALLDUR - Call Duration This command reports the battery level on the remote. If the batteries run low, this command will automatically be sent out reporting the low indication. This command indicates how long a call has lasted. If no call is in session, this will report 0. At the time of call termination, this command will automatically be sent out reporting the duration.
88 Appendix — Serial Commands 89 Appendix — Serial Commands CAMFLOW - Camera Control Flow Control CAMPRESET - Camera Preset This command selects/reports the flow control of the camera control serial port on the unit. Hardware flow control is implemented using DTR and DSR. Executes a camera preset.There is no query for this command.
90 Appendix — Serial Commands 91 Appendix — Serial Commands CAMPRESETSET2 - Camera Preset Setup 2 CAMSWITCHLAG - Camera Switch Time Lag This command sets or reports the current camera preset. This command set the switch time lag for voice tracking.
92 Appendix — Serial Commands 93 Appendix — Serial Commands CLEAREFFECT - Clear Effect Wide Band Telco Emulation COUNTRY - Country Selection This command enables/disables or reports the current status of the clear effect. This command sets/reports the country for compliance.
94 Appendix — Serial Commands 95 Appendix — Serial Commands DEVICE - Device Identification Label DIAL - DTMF Dialing This selects/reports the manufacturer identification label of the specific channel. This command dials a DTMF sequence or reports back the last sequence dialed.
96 Appendix — Serial Commands 97 Appendix — Serial Commands ENETADDR - Ethernet port IP address ENETDNX - Ethernet DNS Selection This command selects/reports the IP address of the Ethernet port on the unit. This command selects/reports the use of DNS of the Ethernet port on the unit.
98 Appendix — Serial Commands 99 Appendix— Serial Commands EQ - Equalization FLOW - Flow Control This command enables/disables or reports the current status of the equalization on the input or output. This command selects/reports the flow control of the serial port on the unit. Hardware flow control is implemented using DTR and DSR.
100 Appendix — Serial Commands 101 Appendix — Serial Commands GREPORT - Gate Report LABEL - Label This command selects/reports the mode of gate status reporting. This selects/reports the label of the specific channel or the unit.
102 Appendix — Serial Commands 103 Appendix — Serial Commands LVL - Level LVLREPORTEN - Level Report Enable This command reports the level of a channel.This command is read-only. Enables level reporting for the unit. ARGUMENT DETAILS ARGUMENT DETAILS Name Channel Group Position Value Type Channel Group Meter Type Signed Float Size 1 1 2 4 Values See Group and Channels 2, 3, 7, 16, 17(O, M, L,T, R) See MeterTypeDefinitions -99.99 - 99.
104 Appendix — Serial Commands 105 Appendix — Serial Commands MICCAMPRESET - Mic Camera Preset MUTE - Mute This command associates a mic with a camera preset for voice tracking. This command selects/reports the setting of mute on a channel.
106 Appendix — Serial Commands 107 Appendix — Serial Commands PBDIAL - Dial a PB Entry by Name PHONEBOOKCNT - Queries the Number of Entries in the Phonebook This command dials a speed dial number by name.There is no query for this command. This command queries the number of entries in the Phonebook.This command is query only.
108 Appendix — Serial Commands 109 Appendix — Serial Commands REDIAL - Dial the last number again RFFREQ - RF Frequency Selection This command redials the last number.There is no query for this command. This command sets/reports the frequency for the RF link to the Remote.The remote must be set to the same setting.
110 Appendix — Serial Commands 111 Appendix— Serial Commands RINGERLVL - Audible Ring Level RINGERTEST - Audible Ring Melody Test This command selects/reports the audible ring level. This command plays the current audible ringer melody.This command is executable only.There is no query. ARGUMENT DETAILS Name Channel Group Value Type Channel Group Signed Float Size 1 1 2 Values See Group and Channels 17 (R) -12.00 - 4.
112 Appendix — Serial Commands 113 Appendix— Serial Commands STEREOMIX - Sets the Input to be a Stereo Mix SYSRESULT - System Check Result This command enables/disables or reports the stereo mix status of an input. This command reports the results of the system check.This command is reportable only. It cannot be queried or set.
114 Appendix — Serial Commands 115 Appendix— Serial Commands TE - Telco Enable UID - Unit ID This command selects/reports the hook status. This command reports the unit ID.This command is read-only.
116 Appendix — Compliance Compliance FCC Part 15/ICES-003 Compliance This equipment has been tested and found to comply with the limits for a Class A digital device, pursuant to Part 15 of the FCC rules and Industry Canada ICES-003.These limits are designed to provide reasonable protection against harmful interference when the equipment is operated in a commercial environment.
118 Appendix — Compliance European Compliance 119 Appendix— Compliance Telecommunications Terminal Equipment: Conformity of the equipment with the guidelines below is attested by the CE mark.
120 Appendix — Index Index Adjusting the Settings 56 Auto-Answer 56 Auto-Disconnect 57 Ring Melody 56 Ringer Level 56 sound cards 19 USB control 21 VCRs 20 video codecs 18 Device Toolbox Editor 49 Audio conferencing 14 add a device 49 delete a device 49 edit a device 49 Basic Room Design 7 Dialer and Phonebook Usage 43 loudspeaker placement 8 Dialer 44 make a call 44 redial 45 Basic Connections 14 Calls 52 answer 52 end 52 from the Phonebook 53 make 52 pre-dial 52 redial 53 speed dial 53 Phoneb