
Installation Guide

clearly secure
GLASS BLOCK WINDOWS
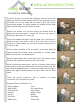
To make sure your new window will fit properly, measure the window
opening as if the frame were already removed. The rough opening size
should be 1/2-in to 2-in larger than the actual size of your Clearly
Secure block window. The space between the window and the rough
opening will be filled with the installation mortar.
Remove the window sash and then remove the window frame by
bending the top and bottom in toward the center or by cutting it.
Remove the old mortar sill if necessary.
Set the new window into place on top of 2 wood shims, check that it is
plumb and level, then secure it with 2 shims at the top. If you are
installing a vented window, the vent latch should be located on the
inside at the top.
Mix the mortar according to the instructions on the bag. Apply the
mortar around the perimeter using a grout bag or a margin trowel.
Make sure the joints are completely full.
When the mortar begins to set, remove the shims, fill the holes, smooth
the joints with a trowel and clean the glass with a cloth.
When installing into wood frames, wall ties should be nailed into the
frame prior to setting the window to give the mortar a better grip. Tool
the mortar back approximately 1/4 in from the outside face of the glass
block, then apply caulking between the glass block and the wood
frame.
These are general instructions. Due to variations in window
construction your installation may differ.
Suggested Tools and Materials List:
• Safety Goggles
• Work Gloves
• Tape Measure
• Hammer
• Pry Bar
• Stiff Brush
• Wood Shims
❶
❺
❷
❸
❶
❷
❸
❹
❹
❺
• Level
• Pre-mixed Mortar
• Clean Water
• Margin Trowel
• Bucket
• Grout Bag
• Clean Cloth
INSTALLATION INSTRUCTIONS