
User Manual

ClearCube Technology, Inc. 3700 W Parmer Lane Austin, Texas 78727 (512) 652-3500 www.clearcube.com
G0200151 Rev D, 1.2.09.27.2012
Page 2 of 4
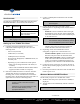
User Accounts
The table below shows the TC8900 Thin Client Windows
Embedded Standard 7 user accounts (case-sensitive).
Setting up Your TC8900 Thin Client
1. Carefully unpack the TC8900 Thin Client and
components. Before beginning, be sure to have the
following items:
– Power cord (included)
–USB mouse (not included)
– USB keyboard (not included)
– DVI-D, DVI-I, DisplayPort, or HDMI monitors (not
included), and
– Depending on your TC8900 Thin Client options:
• Smart card for integrated smart card reader (not
included)
• add-on video card breakout cables for multi-monitor
support (included with add-on card option)
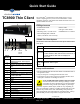
2. Place the TC8900 Thin Client on a desk or attach the
TC8900 Thin Client to a wall using the included
mounting rails. Use the included screws to attach the
mounting rails to the TC8900 Thin Client (see item 3 in
figure above for location of mounting holes).
3. Connect a USB keyboard and mouse to the TC8900
Thin Client.
4. Connect the TC8900 Thin Client and a remote
computing device. Depending on how the thin client is
configured:
– Standard: connect an Ethernet cable to the right-
most Ethernet port on the rear of the TC8900 Thin
Client and connect the other end to an Ethernet port
on the remote device.
– Fiber: connect an LC fiber cable to the fiber
interface card on the rear of the thin client and
connect the other end to the remote device.
5. Depending on how the TC8900 Thin Client is
configured, it supports one to four monitors. For:
– standard and fiber options: connect one or two DVI
monitors to the ports on the rear of the thin client.
– add-on video card option: connect a breakout cable
to the video card on the rear of the thin client, then
connect 1 to 4 DVI-D or DisplayPort monitors (as
appropriate) to the connectors on the breakout cable.
6. Connect the power cord to the AC input on the rear of
the thin client, and then plug the power cord into an AC
power outlet.
7. Press the power button on the front of the TC8900 Thin
Client to power it on.
Windows Welcome/OOBE/First Boot
The first time you power on a TC8900 Thin Client:
1. Windows Welcome process (also known as OOBE) is
displayed.
2. TC8900 Thin Client automatically reboots to the User
account.
Account
Name
Default
Password
Notes
Admin clearcube Change password promptly.
User user TC8900 Thin Client automati-
cally boots to this account.
EWF is enabled.
NOTE Change administrator password immediately
after logging in for increased security.
NOTE Ensure that you mount TC8900 Thin Client
so that no vents or fans are covered or
obstructed.
Fasteners to mount the brackets to a wall
are not included. Ensure you use
appropriate fasteners.
NOTE The included Y-cable is required for PS/2
device support.
NOTE The left-most Ethernet port (when facing the
rear of the thin client) is disabled by default.
You can enable both ports from the BIOS.
NOTE EWF is on by default.
—Continued—