
Instruction Manual
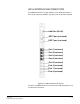

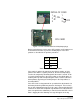

Table Of Contents
- The Eclipse Omega Matrix System: An Overview
- Operation
- The Eclipse Omega Matrix and Circuit Cards
- Front-Panel Controls and Lights
- Central Processor Unit (CPU) Card Description
- Analog Port Card Description
- Power Supply Description
- Connecting the Matrix
- Eclipse Fiber Linking
- Eclipse E-QUE Interface
- Eclipse IVC-32 Interface
- Eclipse LMC-64 Interface
- Installation
- Reconnecting the CPU Card’s Backup Battery
- Verifying the Shipment
- Unpacking the System
- Installing the Eclipse Omega Matrix
- Installing Power Supplies
- Installing the Rear RJ-45 Connector Panels
- Installing Rear RJ-45 Connector Panels in the Field
- Installing CPU Cards
- Installing Analog Port and Expansion Cards
- Wiring Audio Devices to the Matrix
- Wiring CPU Card Interfaces
- GPI/RLY Interface Connector
- RS-232 DB-9 Connector
- Alarm I/O Connector
- General-Purpose Outputs Connector (GP OUT)
- General-Purpose Inputs Connector (GP IN)
- Local Area Network Connectors (LAN1 and LAN2)
- E1/T1 Matrix to Matrix Crossover Cable
- E1/T1 Straight Cable Connections
- E1 to FreeSpeak/CellCom Antenna Pinout
- Maintenance
- Specifications
- Glossary
- Limited Warranty
- Technical Support & Repair Policy

Clear-Com
Eclipse Omega Instruction Manual
7-1
INSTALLATION
RECONNECTING THE CPU CARD’S BACKUP
BATTERY
MPORTANT: Before the Omega is installed the CPU backup battery
must be reconnected.
The matrix CPU card has a lithium backup battery that powers the
CPU memory if the AC electricity fails. This backup battery is shipped
disconnected to preserve battery life. When the matrix is received the
battery must be reconnected.
The matrix will operate if the battery is not reconnected. However, if the
matrix is powered down all configuration information stored in the
matrix’s CPU card will be lost.
To reconnect the CPU memory’s backup battery:
1. Please observe anti-static procedures. The CPU card can be
damaged by static electricity. Anyone reconnecting the battery
should ensure that they ground themselves and all tools before
touching cards.
2. Locate CON9 on the centermost upper portion of the CPU card.
Under the CON9 heading, there are three pins. A jumper plug is
placed over pins 2 and 3. This is the OFF position.
3. Lift the jumper plug off the pins, and place it over pins 1 and 2. This
is the ON position.
The battery is now powered.
On older Eclipse Omega CPU cards the battery is normally a CR2430
3V VARTA 6430-701-501 and would be fitted on shipment. This has a
capacity of 280mAh and a life of approximately 73 days. These
batteries should only be replaced by qualified service personnel.
Later Eclipse Omega CPU cards are fitted with a socketed battery
which is normally a Renata CR2477N with a capacity of 950mAh and a
life of approximately 247 days. These socketed batteries are easily
replaced and this operation does not have to be carried out by service
personnel.
Note: If the matrix is stored for more than three months, or if the
AC power to the matrix is regularly turned off (as in Outside
Broadcast vans), a qualified service person should be
contacted to disconnect the CPU backup battery before
storing the matrix. Only a qualified service person should
attempt to disconnect the battery. To contact a qualified
service person, please see the information in the Warranty
chapter.
The Eclipse Omega matrix
installs in a standard
Electronic Industry
Association 19-inch (48 cm)
equipment rack.
7