
Instruction Manual


15 Tempest®24 00 MasterBelt
Pairing BeltSta ons to MasterBelt
Pair BeltSta on to MasterBelt:
Con rm that the MasterBelt is powered ON and in Opera onal Mode (not
in Menu Mode) and that the BeltSta on is powered OFF. Con rm that the
MasterBelt’s Network Number and Lockout Key are adjusted as needed.
See the
sec on on Set Network Number and Lockout Key.
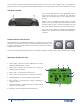
Plug one end of the pairing cable into the MasterBelt and the other end into the
BeltSta on.
The pairing cable is a standard 3.5mm
(1/8 in.) Male to Male stereo patch cord.
Turn the BeltSta on power ON by pressing and holding the BeltSta on Power ON/OFF bu on for two seconds. The pairing
process will begin automa cally. Watch for the message “Pairing Complete” to appear briefl y on the BeltSta on display.
The BeltSta on will automa cally re-ini alize.
Name MasterBelt
Name the MasterBelt with a descrip ve name. The MasterBelt name can include up to 14 characters. Prior to a name being
assigned, a hexadecimal serial number is displayed as a default.
The MasterBelt name will appear on the LCD Display, on the BeltSta on LCD display, and in the BeltSta on’s menu under
“Select Base.”
To name each MasterBelt:
1. On the MasterBelt press MENU and select “Belt Se ngs,” then “Name BeltSta on.”
2. Rotate the Volume control to move the underscore “_” to select the character to be changed.
3. Press ENT and no ce the underscore changes to a pointer “Λ” under the selected character.
4. Rotate the Volume control to scroll through the character list. Press ENT to select the new character. Characters always
replace and never insert. Repeat as needed.
5. Press ENT to save the new name a er all characters are complete. Failure to press ENT to save will clear all changes.
6. Press MENU to escape to the Opera on Mode screen.
Naming the BeltSta on works the same as naming the MasterBelt.