
Operation Manual

28
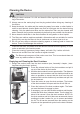
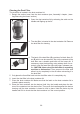
7. Pull the dust container lid together with the dust fi lter unit
out of the dust container compartment.
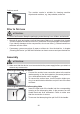
8. Remove the rubber seal (A) from the dust fi lter unit.
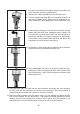
9. Turn the plastic dust fi lter (B) in the opposite direction to
the dust container lid (C) (see arrows in diagram) to re-
lease it and pull it down and away from the dust fi lter unit.
10. If necessary, thoroughly rinse the dust container and the
plastic dust fi lter with clear, lukewarm water. Caution: Do
not under any circumstances clean the dust container or
the plastic dust fi lter in a washing machine or dishwasher!
Then shake off any excess water and allow the fi lter to dry
completely in the air before reinserting it.
11. If necessary, use a damp cloth to clean the dust container
lid and the rest of the plastic dust fi lter unit.
12. Only reassemble the device once all the parts are com-
pletely dry. Place the plastic dust fi lter back onto the dust
fi lter unit and turn it tight. Place the rubber seal back onto
the dust fi lter unit.
13. Place the dust fi lter unit back into the dust container and screw the dust container
lid fi rmly onto the dust container so that the arrow marking on the dust container lid
points towards the closed lock symbol on the dust container.
14. Place the dust container into the device: Hold it by the handle and place the bot-
tom of the container into the device fi rst. Then push the handle against the device
housing until the dust container is heard to lock in place. Hold the device by the
handle and lift it to check that the dust container is in the correct position.
(A)
(B)
(C)