
Operation Manual

21
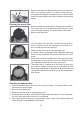
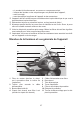
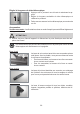
5. Depress and hold the release button and put the dust bin
back in the vacuum cleaner. The dust bin has been pro-
perly positioned when the release button pin (C) is located
under the bracket (D) on the vacuum cleaner housing (see
fi gure).
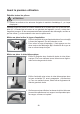
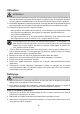
Cleaning the motor fi lter
1. Remove the dust bin (see section “Emptying the dust bin”).
The motor fi lter (1) is located behind the dust bin in the
vacuum cleaner housing. It is protected by a foam fi lter.
2. Remove the foam fi lter.
3. Turn the frame with the fi lter counterclockwise and re-
move it. Reach into the two recesses on the frame in or-
der to rotate and remove the frame.
4. Shake out the fi lter over an open garbage can.
5. If needed, clean the fi lter with clear, lukewarm water and
allow it to dry completely. Do not insert the fi lter if it is still
moist.
6. Place the frame with the fi lter back in the vacuum cleaner
housing and turn it clockwise to secure it. Reach into the
two recesses on the frame as when removing it.
7. The motor fi lter is in place when the frame is fl ush with
the vacuum cleaner housing and the recesses on the
frame are perpendicular to the bracket (D) on the vacuum
cleaner housing and are vertically in line with one another
(see fi gure).
Cleaning the exhaust fi lter
1. Open the exhaust fl ap on the back of the vacuum cleaner. The exhaust fi lter is loca-
ted behind the exhaust fl ap.
2. Remove the exhaust fi lter.
3. Shake out the fi lter over an open garbage can.
4. If needed, clean the fi lter with lukewarm warm water and allow it to dry completely.
Do not in any case insert the fi lter if it is still damp.
5. After cleaning and/or drying the exhaust fi lter, place it back in the exhaust fl ap and
close the fl ap. It must audibly lock into place.
D
C
1
D