
Operation Manual

EN 22
3. Turn the frame with the fi lter counterclockwise and re-
move it. Reach into the two recesses on the frame in
order to rotate and remove the frame.
4. Shake out the fi lter over an open garbage can.
5. If needed, clean the fi lter with clear, lukewarm water and
allow it to dry completely. Do not insert the fi lter if it is still
moist.
6. Place the frame with the fi lter back in the vacuum cleaner
housing and turn it clockwise to secure it. Reach into the
two recesses on the frame as when removing it.
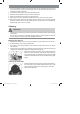
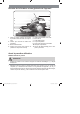
7. The motor fi lter is in place when the frame is fl ush with
the vacuum cleaner housing and the recesses on the
frame are perpendicular to the bracket (D) on the vacuum
cleaner housing and are vertically in line with one another
(see fi gure).
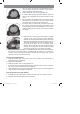
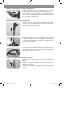
8. Make sure when inserting the dust bin that it engages
correctly in the vacuum cleaner housing. Therefore,
drepress and hold the release button when inserting the
dust bin and release the button when the button pin is lo-
cated unter the bracket on the vacuum cleaner housing.
Do not force the button pin into the bracket. When
inserted, the air intake pipe of the dust container must sit
correctly on the opening on the dust container housing
(see picture) so that no air can escape at the sides.
9. After inserting the dust container, you should therefore switch on the device and block
the entrance to the suction tube on the handle with an object (e.g. a cushion etc.)
so that a vacuum can be produced and the air intake pipe can “fi rmly suck” onto the
opening on the vacuum cleaner housing.
Cleaning the exhaust fi lter
1. Open the exhaust fl ap on the back of the vacuum cleaner. The exhaust fi lter is
located behind the exhaust fl ap.
2. Remove the exhaust fi lter.
3. Shake out the fi lter over an open garbage can.
4. If needed, clean the fi lter with lukewarm warm water and allow it to dry completely.
Do not in any case insert the fi lter if it is still damp.
5. After cleaning and/or drying the exhaust fi lter, place it back in the exhaust fl ap and
close the fl ap. It must audibly lock into place.
Cleaning the housing and nozzles
1. If needed, clean the housing with a damp, soft cloth. Then dry it with a soft cloth.
2. Regularly remove hairs and lint from the nozzles.
D
07420_DE-EN_FR-NL_A5_V1.indb 2207420_DE-EN_FR-NL_A5_V1.indb 22 15.07.2015 09:19:1115.07.2015 09:19:11