
Installation Guide


Page 8 of 10
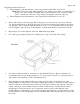
It is required that proper eye protection be worn while using the jigsaw. Cut directly on the center of the
traced lines. Upon reaching the corners while cutting, tilt the jigsaw outward to prevent cutting past your
lines on the vertical ends of the CleanCut Ultra-Low. Remember to tilt your blade on each corner, cutting
all areas that have been marked.
9.
Place the CleanCut Ultra-Low into position. Remember, the straight face of the CleanCut Ultra-Low is
on the outside of the tub. Use a small pocket mirror and look for areas on the CleanCut Ultra-Low that
may be catching and prohibiting the CleanCut Ultra-Low from freefalling onto the tub. Use the jigsaw
or drywall plane to trim the CleanCut Ultra-Low where necessary.
10.
Continue this process and repeat as necessary until a desirable close fit is achieved. The CleanCut
Ultra-Low should free fall onto the tub without catching or binding. Once final adjustments have
been made, use a drywall plane or deburring tool (a common potato peeler works well) to clean up
the remaining edges.
11.
Having completed use of the jigsaw, take a moment to tidy the tub and work area.
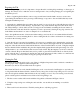
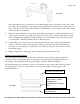
Support Structure Installation
Once the CleanCut Ultra-Low has been cut and a satisfactory fit into the tub opening is achieved, it
will be necessary to assemble the support box structure to provide support to the CleanCut Ultra-Low.
An example of the CleanCut Ultra-Low and the support structure is illustrated in Figure 6.
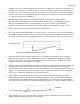
The CleanCut Support box structure consists of one small and one large Support Box. The large support
box will compress over the top of the small box to the necessary height to provide support to the
CleanCut Ultra-Low.
It is important to understand that each tub has variations and modifications maybe necessary in the field.
CLEANCUT ULTRA‐LOW
SUPPORT BOX
STRUCTURE – LARGE
SUPPORT BOX
COMPRESSED ON SMALL
BOX
BASE 2X4 AFFIXED TO FLOOR,
IF NECESSARY
FIGURE 5
FIGURE 6