
Installation Guide


Page 7 of 10
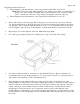
6.
Place step as shown and connect each side of the outside tub line using a yard stick (Figure 4).
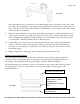
7.
Use a tape measure and transfer the shape of the inside of the tub edge to the step. The inside of the
tub may be irregular in shape, so measurements for the inside line must be made every 3” from one
end of the CleanCut Ultra-Low to the other. Once completed, use your yard stick and marker to
connect the markings for the inside line.
** Alternate Method - You may use card stock paper such as done with the sides to create a bottom
template.
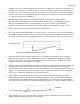
8.
Cut the CleanCut Ultra-Low to fit the cut-out tub opening using a jigsaw (Figure 5). Fasten Velcro-
stripping on both sides of the jigsaw to prevent making any unwanted marks on the CleanCut Ultra-
Low. It is important that a 2” blade is used to cut out the CleanCut Ultra-Low so as to prevent
accidentally cutting through the top of the CleanCut Ultra-Low. Snap off any excess length on the
stock jigsaw blade beyond 2”.
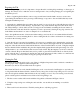
USE THE JIGSAW TO CUT THE LINES TRACED ON THE ULTRA-LOW.
FIGURE 3
SIDE VIEW OF
LEFT END OF
STEP
PATTERN MARKS - - -
- - - - INDICATE THE
AREA TO BE CUT
OUT ON THE LEFT
END OF THE STEP.
1”
FIGURE 4