
Installation Guide


Page 5 of 10
4.
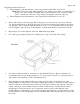
The opening for the CleanCut Ultra-Low is now completed and you can remove the cut-out section. Use
caution when removing the cut-out section as there may be sharp or jagged edges both on the cut-out
segment and along the edges of where the cuts were made on the sides of the tub. It is helpful to spend a
moment to file down any potential hazard areas. This prevents potential snags with fitting the CleanCut
Ultra-Low and reduces the risk of injury.
5.
After the cut out section of the tub has been removed, take a few moments to clean the area in around
the tub. Using a dust pan and broom, sweep all dust and shavings. Complete the clean-up by thoroughly
vacuuming the entire area. Wash your hands before you start any work on the step itself. This will
eliminate transferring any dirt or dust to the step.
SPECIAL CONSIDERATIONS FOR CUTTING CAST-IRON TUBS
Due to the significant amount of dust created when cutting a cast-iron tub, it is recommended that you cover
all tub and exposed bathroom walls and surfaces (including the floor) with a 2-ply drop cloth to minimize the
amount of dust that can settle. Also, it is recommended that the installer wears protective coveralls and shoe
covers, in addition to protective wear outlined earlier, to minimize the clean-up after cutting out a cast-iron
tub.
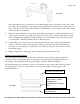
Please note that there are several differences when cutting out a cast-iron tub compared to a fiberglass or
steel tub. The side-grinder with a 4.5” diamond blade is the only tool used when cutting a cast-iron tub. Cast-
iron tubs are a bit more challenging to cut. Vacuum the dust and shavings as you cut the tub with the use of
the Dust Buddie that contains a cover plate and vacuum attachment. The Dust Buddie connects directly to
the grinder to minimize dust output when cutting the cast-iron.
Follow the same pattern when cutting a cast-iron tub as described for the fiberglass and steel tubs. Begin by
cutting the bottom lines of your template, followed by the downward vertical cuts leaving the top adjoining
pieces for last.
Be cognizant of potential safety issues when cutting the tub such as sparks generated during cutting as
well as items that may be located within the tub wall such as water lines, electrical lines, insulation or
other items.
Measuring & Cutting the CleanCut Ultra-Low
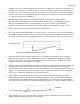
Once you have completed cutting out a section of the tub, you can begin to fit the CleanCut Ultra-Low into
the tub opening. First, measure the top rail width measurement as well as the width measurement
approximately 14.75” down the tub (bottom measurement)
FIGURE 1