
Installation Guide


Page 3 of 10
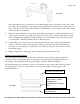
Thank you for your interest in the CleanCut Ultra-Low. This installation manual includes an
overview of the CleanCut Ultra-Low installation kit as well as instructions pertaining to the
step-by-step instructions for CleanCut Ultra-Low installation.
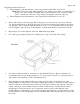
CleanCut Ultra-Low Installation Kit
The CleanCut Ultra-Low installation kit includes the following items:
•
One CleanCut Ultra-Low
•
One CleanCut Ultra-Low Support Box Structure (large & small box)
•
Template to be used for cutting the tub
•
Two tubes of required adhesive
•
Caulk gun extension tube
Tools & Materials
In addition to the items included in the installation kit, the following tools and materials are recommended
to have on hand for installation.
Additional Tools & Materials
Butane Torch
Card Paper
Caulking Gun (High Torque Ratio)
Chisels
Deburring Tool (i.e., file, knife)
Denatured Alcohol
Drain Screens
Drill & Drill Bits
Drop Cloths
Drywall plane or Rasp
Dust Masks
Dust Pan & Brush
Ear Protection
Extension Cord
Fire Extinguisher
Gloves
Hammer
Jigsaw with 2” Blade
Masking Tape
Mirror (small)
Paper Towels
Pliers
Pressure Treated 2 X4’s
Protective Eye Wear
Reciprocating Saw with Metal Blades
Scissors
Screw Driver
Screws- Assorted Sizes
Side Grinder with 4.5” Diamond Blade*
Red Sharpie Marker
Utility Knife
Vacuum with Attachment*
Wood Shims
* These items are available for purchase from
CleanCut