
Installation Guide


Page 6 of 9
1.
Take a stack of heavy card stock paper. This is the paper used to trace the cut- out section of the tub onto
the CleanCut Step. Place the card paper onto the left end and trace the outline of the pattern onto the
paper. Once completed, mark this tracing as “Left”, so as to remember which side was traced. It is also
helpful to place an arrow on the template to indicate which direction is the inside of the tub.
2.
Repeat the process for the right side of the tub. Mark this tracing “Right”.
3.
Cut out the proper templates with scissors making sure to keep to the inside of the tracings.
4.
It is time to transfer the shape of our cut tub onto the CleanCut Step. Before continuing, it is
recommended that a drop cloth approximately 3’ x 4’ size be placed on the floor to prevent any dust or
other debris from transferring onto the CleanCut Step.
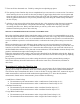
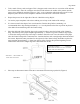
5.
Place the right end of the CleanCut Step on the ground in order to trace the left side of the CleanCut
Step. Place the top of the paper template approximately ½” from the top of the CleanCut Step (Figure
3). Place the tracing on the step so the slope is similar to that of the tub. Trace the outline of the paper
onto the CleanCut Step with a continuous line. Continue the lines with a straight edge down and around
the corners. Repeat the same procedure for the right end of the CleanCut Step. Remember to place the
paper template approximately ½” down from the top of the CleanCut Step before beginning to trace.
Continue the lines with a straight edge down and around the corners.
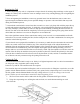
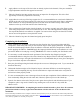
6.
Place step as shown and connect each side of the outside tub line using a yard stick (Figure 4).
FIGURE 4
PATTERN MARKS - - - - - - - INDICATE
THE AREA TO BE CUT OUT ON THE
LEFT END OF THE STEP
FIGURE 3 – SIDE VIEW OF
LEFT END OF STEP