Pilot PLUS Brand Name: plum Model Name: Z550 FCC ID: Y7WPLUMZ550
Contents Safety ........................................................................................................4 Environment..............................................................................................5 1 Getting Started .......................................................................................5 1.1 Getting to know your touch phone ...............................................5 1.2 Installing the SIM card, battery, and storage card...........................5 1.
9.1 Calendar .................................................................................. 37 9.2 Alarm Clock ............................................................................ 39 9.3 Calculator ................................................................................ 41 10 Play Store* ..........................................................................................
Safety Never attempt to disassemble your phone. You alone are responsible for how you use your phone and any consequences of its use. As a general rule, always switch off your phone wherever the use of a phone is prohibited. Use of your phone is subject to safety measures designed to protect users and their environment. Do not use your phone in damp areas (bathroom, swimming pool…). Protect it from liquids and other moisture.
Road safety: Do not use your phone when driving. In order to give your full attention to driving, stop and park safely before making a call. You must comply with any current legislation. Environment Packaging: To facilitate the recycling of packaging materials, please obey the sorting rules instituted locally for this type of waste. Batteries: Spent batteries must be deposited at the designated collection points.
facing down and its cut-off corner facing out the card slot. 3. Slide the SIM card completely into the slot. Note: • The phone can be supported the double SIM cards. The card slot 1/2 will be both supported 3G SIM card (WCDMA), but one SIM card can use 3G networks only.
To install a memory card To have additional storage for your images, videos, music, and files, you can purchase a memory card and install it into your device. 1. Make sure that your device is turned off, and then remove the back cover. 2. Locate the memory card slot on the upper part of the exposed right panel. 3. Insert the memory card into the slot with its gold contacts facing down until it clicks into place. Note: To remove the memory card, press it to eject it from the slot. 1.
„Silent‟ check box. Screen sleep After a period of inactivity, your screen will go to sleep (display will turn black). In sleep, your phone uses less battery power. You can control this behavior: Set screen timeout period 1. On the Home screen, touch and select Settings. 2. Select Display option. 3. Select Sleep. Select a time from the menu. Prevent sleep while charging 1. On the Home screen, then touch and select Settings. 2. Select Developer options. 3. Select „Stay awake‟ check box.
1. Touch the application tab with your fingertip to reveal the application icons. 2. The Home screen actually extends beyond the screen width. On Home screen, slide your fingertip left and right along the screen to reveal the full width of the Home screen. This additional space gives you more room to customize Home with applications, shortcuts, and widgets. 3.
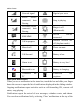
status icons.
notifications window. To open the message, reminder, or other notification, you can touch the items. To close the notifications window, slide your finger up the screen.
Touch the on-screen dial pad to enter a number, touch „Delete‟ button to delete numbers you‟ve entered. Touch & hold to delete all the numbers in the field. To dial a number, touch „Voice Call‟ button (Green icon ) to select SIM1 card or SIM2 card to make a call. To end a call, touch „END‟ button (Red icon). 1. Call log tab: Select an entry listed in the log to call the number. 2. Contacts tab: Contacts with phone numbers are listed. Select a contact, and then select the phone number to dial the call.
green bar. To turn it off, select it again so the bar is unfilled. The status bar will display this icon when Mute is on. 3. Hold: To put an active call on hold, select „Hold‟ so it shows a green bar. To resume the call, or take the call off hold, select it again so the bar is unfilled. If you take a call while already on a call, the first call will be placed on hold automatically. The status bar will display this icon when a call is on hold. 4.
settings,you can make the operation of voice call, voice call and the other settings. Note that when you open „Call settings‟ for SIM1 or SIM2, your current settings are fetched, which can take a few moments. 3 Setting on your device Control phone-wide settings from the Home settings screen: touch and select Settings. 3.1 Wireless & networks SIM management You can select to activate or deactivate the SIM card you want to open. Set the default SIM to use voice call, Video call and message, data connection.
PIN code. • Rescan for devices. More… Airplane mode on/off: When airplane mode is selected, all wireless connectivity is off. This icon will display in the status bar when airplane mode is selected. Mobile network • Select data roaming capability. • Select a wireless operator network - Scan for all available networks, or select a network automatically. • Add or edit network Access Point Names (APNs) - Do not change this setting unless advised to do so by your wireless operator! 3.
along the brightness bar to set the level. In sunlight, increase the level. Sleep: Select to decide how long your phone must be inactive before the screen turns off. Storage View and manage the data storage on your phone. Memory card: Monitor and manage the use of your Memory card from this screen: 1. View how much space you are using on your memory card. 2. Select to use your memory card as USB mass storage when your phone is connected to your computer (selected by default) 3.
Unknown sources: Select this check box if you want the ability to download applications from the Web. With this check box not selected, you will only be able to download applications from Android Market. To ensure your personal data and phone remain secure; it is recommended you not select this check box. Backup & reset You can select to reset your phone to factory settings.
4 ActiveSync 4.1 Data synchronization Some applications on your phone (Contacts and so on) give you access to the same personal information that you can add, view, and edit on your computer using Web applications. This means that when you add, change, or delete your information in any of these applications on the Web, the updated information also appears on your phone, and vice versa.
3. By default, the personal information in Contacts will sync whenever you make a change or receive a new message. You can change this behavior: Auto-sync: When selected, Auto-sync will sync Contacts automatically, as you make changes or receive new messages. When OFF, information will not be synced automatically, although you can force sync by using the individual application check boxes described below. 4.
Pair & connect with Bluetooth devices Before your phone can communicate with a Bluetooth headset or hands-free car kit, the devices must “pair”, then “connect”: 1. Make sure you have turned Bluetooth on. 2. Touch “SEARCH TOR DEVICES” and your phone starts scanning for Bluetooth devices within range. As they are found, the devices appear in the list of Bluetooth devices. 3. To pair with a device in the list, select it. 4. Type the device‟s PIN and then select „OK‟. 5.
in the Contacts tab. Only those contacts you star as “favorites” are listed in the Favorites tab. Browse through your contacts by sliding your fingertip up and down on the screen. Another way to find a contact quickly is to use “SEARCH” button, input the first letter of the name you‟re looking for and touch search icon, the matching contacts are appeared on the screen. From the Contacts tab, you can: 1. Take action on a contact: Touch the contact‟s name to open the context menu.
2. Touch the star icon on the right-top screen, and the color of star is changed from grey to white. 3. Now your contact will be listed in Favorites. Edit contact details You can always make changes to the information you‟ve stored for a contact: 1 From Contacts, touch the contact you want to add to Favorites to open the Contact details screen. 2. Select „Edit‟. The Edit contact screen appears. 3. Make your edits, then press „Done‟.
• Complete your message, select „Send‟. SIM contacts importer If you have stored names and phone numbers on your SIM card, you can add these to the Contacts stored on your phone by selecting this settings option. From the contact list, press MENU to select „Import/export‟, you can select to import from SIM card or memory card, once the list of names and numbers appears you can: Import all names/numbers in the list - Press MENU and select „Import all‟.
Note that messages you send are also listed in the Read view. 1. Reading multimedia messages If you have selected to auto-retrieve your multimedia messages, then both the message header and body will download. If you are downloading only the headers, then you must first select the Download button to retrieve the message body. If you are concerned about the size of your data downloads, you can check the message size before you download.
Add as many recipients as you wish. If you send the message to an email address, the message will automatically convert from a text to a multimedia message. 3. To add a subject, press MENU and select „Add subject‟. If you add a subject, the message will convert to a multimedia message. 4. To add an attachment, touch „Attach‟ icon on the right-top of the screen. Adding an attachment will always convert the message to a multimedia message. Select from audio or picture files.
2. Text message settings Delivery reports: To receive a report on the delivery status of your message, select this check box. Manage SIM card messages: Text messages can also be stored on your SIM card. The exact SIM card number depends on your card, but it is usually around 25-50. To view messages on your SIM card, delete them, and copy them to your phone memory, select this setting. 3.
5. Select „Next‟. If you have a popular email account, the application will set everything up for you! Before you go to your Inbox, you can name the account (if you don‟t, your email address will be used). You are also asked to type your name as you want it to display on outgoing messages. You must complete this field before you can select „Next‟ and go to your Inbox. For less popular accounts, follow the prompts to type the email server, protocol, and other account information yourself.
in the Trash you must delete each message individually. Press MENU and select „Folders‟ to enter the Trash. Note that the message is only deleted from your phone, not from the account server. 7. Remove an email account: You can always remove a POP3 or IMAP email account from your phone. Go to your Inbox, press MENU and select „Accounts‟. Your Accounts screen opens. Touch & hold the account you want to remove to open the context menu. Select „Remove account‟.
Press MENU and select „Add account‟ another account. 7 Internet 7.1 Ways of Connecting to the Internet Your device‟s networking capabilities allow you to access the Internet or your corporate network through WLAN, GPRS, EDGE (if available), or WCDMA (if SIM card supported). You can also add and set up a VPN or proxy connection. WLAN WLAN provides wireless Internet access over distances of up to 100 meters (300 feet). To use WLAN on your device, you need access to a wireless access point or “hotspot”.
1. Go to a Web page: Make sure the focus is not on a text box and then start typing the URL. 2. Add a bookmark: Bookmark the Web page you are currently viewing: • Press MENU and select „Save to bookmarks‟. • Confirm the URL and name, and then select „OK‟. To view all your bookmarks, press MENU and select Bookmarks. 3. Refresh a Web page: To refresh the contents of the current page, press MENU and select „Refresh‟.
6. Bookmark current page: Go to a Web page you want to bookmark. Press MENU and select „Bookmarks‟. The Bookmarks screen opens. Press MENU and select Bookmark last-viewed page. The Bookmark link dialog box opens. Confirm or edit the information, then select „OK‟. Set your home page You set your home page from the Settings screen: 1. Press MENU and select More > Settings. The Settings screen opens. 2. In the Page content section, select „Set home page‟ to open the dialog box. 3.
Read the instructions below to add pictures to your Memory card or the phone storage. 1. Mount your memory card to your computer by doing one of the following: Remove the memory card and insert it into a card reader attached to your computer. 2. On your computer, find the mounted USB drive and open it. 3. Create a folder at the top-level called “Pictures” or some other descriptive name and open it. 4. Copy .jpg or other image files into this folder.
to load. 3. If you‟ve stored your pictures in folders on your Memory card, then the folders will display as separate “albums”. The top left album always contains all the pictures in all the albums. 4. The individual pictures display in a grid in thumbnail format. You can select to display smaller or large thumbnails in Settings. 5. To open a picture in full-screen view, touch the picture. Once in full-screen, select the arrows to scroll through the pictures within that album.
edge in or out to size. Touch & drag the center of the cropper to move it within the picture. 3 When you are happy with the cropped area, select „Save‟. Select Discard to cancel the crop. The cropped picture is saved to Pictures as a copy. Your original is not touched. 8. Rotate picture: In full-screen view, press MENU and select Rotate. Select from Rotate left (counter-clockwise) or Rotate right (clockwise). Your picture rotates and is saved automatically. 9.
want) to store your files. 4. Open this folder and copy music files into it. If you want, create folders within “music” to organize your music further. If you want to use certain music files as phone, notification, or alarm ring tones. Note: If you do not want a ringtone to appear in your music Library but you do want it to be available as a ringtone, and then create the “ringtones”, “notifications”, or “alarms” folder outside your “music” folder. 5.
artist, album, or song that you want on a playlist. 2. Touch & hold the artist, album, or song to open the context menu. 3. Select Add to playlist. 4. In the Add to playlist menu that opens, select New to create a new playlist, or one of the existing playlists. 5. The song(s) are added. Manage your playlists Go to the Library screen and select „Playlists‟. All your playlists appear. Touch & hold the playlist to open the context menu.
8.4 Sound record The phone can be as sound record. 9 Other applications 9.1 Calendar Calendar views You can view multiple calendars on your phone, so each calendar event is coded with a color. You can view your calendar in a variety of ways. Touch the date on the left-top of the screen to select from Day, Week, Month or Agenda. 1. Month view Days are shown in a month grid. Busy time slots are shown as vertical bars in the corresponding part of the day.
View event details - Select the event to view its details. Edit an event - First, select the event to view its details. Assuming you have write privileges on an event, touch and hold the event and select „Edit event‟ to open the event for editing. Navigate within the current month - Slide your fingertip up/down. 3. Week view Days are shown vertically within the Week view. Time slots are defined horizontally in rows. Events are shown as blocks.
screen. Create an event From any of the views, press MENU and select „New event‟ to open the new Event details screen. • Type the information in the fields. • Select date & time. • Name that appears in Day view. • Description can be as long as you like. • Select a calendar if you display more than one. • Set a default reminder time. • Set online presence: available or busy. • Select calendar privacy from Default (as defined when calendar was created), Private, or Public. When finished, select „Done‟.
Repeat: The current repeat selection is shown. To change the setting, select Repeat and make a selection from the menu. To have your alarm will only go off once at the set time, don‟t select any of the options. A one-time alarm is shown on the Alarm Clock screen without any days under the set time. Ring tone: The current ring tone selection is shown. Select Ring tone to pick another ring tone that will play when the alarm rings. (When you select a ring tone, it plays briefly.
9.3 Calculator To open Calculator, on the Home screen, then touch and select the Calculator icon. The Calculator offers two panels: basic and advanced. Switch back and forth between panels by pressing MENU and selecting „Advanced panel‟ or „Basic panel‟, as you wish. Calculator panels Two calculator‟s panels are available: basic and advanced. Use the Basic panel to enter numbers and perform basic addition, subtraction, multiplication, and division.
Scroll horizontally through the featured items or select a category to browse its contents, and then select a subcategory. Within each subcategory you can select to view items sorted by popularity or by date. Note that all items in a subcategory are listed in each tab; those in the by popularity tab are sorted most popular to least popular, and those in the by date tab are sorted newest to oldest. Install an item 1. Navigate to an item you want to install and select it. 2. The Item details screen appears.
1. From the Android Market home screen, press MENU and select „Downloads‟. 2. If you are in the process of downloading and installing an item, the progress will display at the top of the screen. Review a downloaded item You can rate and post comments on any item you‟ve downloaded from Android Market. Note that you must first rate an item to post a comment. Uninstall a downloaded item 1. From the Android Market Home screen, press MENU and select „Downloads‟. 2. Select the item you want to uninstall.
1. From the Android Market Home screen, press MENU and select „Downloads‟. Select the item you want to comment on to open its details screen. 2. Select the Post a comment section to open „Post comment‟ dialog box. If you don‟t see the Post a comment section, first rate the item. 3. Type your comment, and then select „OK‟ to post it. Remove rating and/or comment Once you‟ve rated or commented on an item, you can always remove this review: 1.
FCC RF EXPOSURE INFORMATION: WARNING!! Read this information before using your phone In August 1986 the Federal Communications Commission (FCC) of the United States with its action in Report and Outer FCC 96-326 adopted an updated safety standard for human exposure to radio frequency (RF) electromagnetic energy emitted by FCC regulated transmitters. Those guidelines are consistent with the safety standard previously set by both U.S. and international standards bodies.
(2) this device must accept any interference received, including interference that may cause undesired operation. NOTE: The manufacturer is not responsible for any radio or TV interference caused by unauthorized modifications to this equipment. Such modifications could void the user’s authority to operate the equipment. NOTE: This equipment has been tested and found to comply with the limits for a Class B digital device, pursuant to part 15 of the FCC Rules.