X400 User Guide FCC ID: Y7WPLUMX400 1
1 2 3 Introduction .............................................................................................................. 3 Safety & Notice......................................................................................................... 3 Start to use ............................................................................................................... 5 3.1 Icon and symbol .............................................................................................. 5 3.
8.4 8.5 9 FM Radio....................................................................................................... 28 Sound Recorder ............................................................................................ 28 Other application ................................................................................................... 29 9.1 Clock ............................................................................................................. 29 9.2 Calculator ...............
equipment and medical devices, such as pacemakers, hearing aids and other medical electronics equipment. Non-original accessories and components are not provided with repair warranty qualification. Please do not disassemble your phone by yourself, if your phone is out of order, please contact your supplier. Please do not charge the Smart Phone before battery is installed. Do not short-circuit the battery.
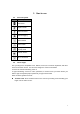
3 Start to use 3.1 Icon Icon and symbol Explain New Email Airplane mode USB connected USB debugging Return button Home button Display recently-used Current electric Wi-Fi connection 3.2 Touch & type Use your fingers to manipulate icons, buttons, menus, the onscreen keyboard, and other items on the touch screen. You can also change the screen's orientation. To select or activate something, touch it. To type something, such as a name, password, or search terms, just touch where you want to type.
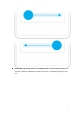
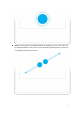
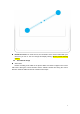
Drag: Touch & hold an item for a moment and then, without lifting your finger, move your finger on the screen until you reach the target position. For example, you can drag to reposition shortcuts on the Home screen. Swipe or slide: Quickly move your finger across the surface of the screen, without pausing when you first touch (so you don't drag something instead). For example, you can slide a Home screen left or right to view the other Home screens.
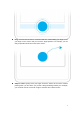
Double-tap: Tap quickly twice on a webpage, map, or other screen to zoom. For example, double-tap a webpage in Browser to zoom in, and double-tap again to zoom out.
Pinch: In some apps (such as Maps, Browser, and Gallery), you can zoom in and out by placing two fingers on the screen at once and pinching them together (to zoom out) or spreading them apart (to zoom in).
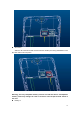
Rotate the screen: On most screens, the orientation of the screen rotates with your device as you turn it. You can change this Display setting. (Please provide drawing picture) 3.3 Assemble & charge SIM card in Please according to the label on the phone. Make sure that the clipped corner of the SIM card is facing the correct direction and the metallic contacts are facing the correct direction. Slide the SIM card into the card slot until it stops.
SD card in Slide the SD card into the SD card slot with the metallic pins facing downwards. Push the card until it locks into place. Warning:Use only compatible memory cards for use with this device. Incompatible memory cards may damage the card or the device and corrupt the data stored in the card.
With the metallic contacts of the battery facing the metallic contacts in the battery slot, press the battery down until it locks into place. Charge up Ensure the battery is inserted in the handset. To charge the battery, plug in the charger connector at your phone (USB interface) and then plug the other end into an AC power socket. The battery symbol indicates the charging status. While charging, the charge indicators will scroll. When all the scroll bars are steady, the battery is fully charged.
Type in PIN — If you have already set the SIM code. Search—The handset will be searching for proper network connection. 3.3.2 Unlock SIM card To avoid illegal use, the SIM card is enciphered with PIN (personal identification number ) as a protection. When this function is ON and you have already set a PIN code, you need to type in PIN code every time the handset is switched on in order to unlock SIM card and use the handset. You can turn off the SIM PIN code.
3.5 Android Keyboard setting You can be set on the Android keyboard. Into Settings menu: Settings > input & language > Android keyboard. Touch “ ”: Input languages: You can choose the system language or desired language. Auto-capitalisation: Capitalise the first word of each sentence. Vibrate on keypress: After check on, touch the keyboard will vibrate. Sound on keypress: After check on, touch the keyboard will sound.
3.6.1 Enter text Touch the keys on the keyboard to type. Use the Delete key When you finished typing, Press Back key to close the keyboard. to erase characters to the left of the cursor. Enter Various Characters Touch the Symbols key Touch 3.6.2 to switch to the numbers and symbols keyboard. on the symbols keyboard to view additional symbols. Edit Text You can edit the text you enter in text fields and use menu commands to cut, copy, and paste text, within or across applications.
To remove a shortcut on Home screen If you want to remove the shortcut, you can touch and hold the shortcut icon on Home screen until it vibrates, and then drag it to Remove tab. 3.8 Bluetooth Bluetooth is a short-range wireless communications technology that devices can use to exchange information over a distance of about 10 meters. Turn Bluetooth on or off, search for available Bluetooth devices, and make your phone visible or invisible to other Bluetooth devices. 1.
4 Phone 4.1 Make a call Touch phone icon on the Home screen. In dialing screen, input number and touch Dial icon to dial the inputted number. 4.2 During a call During a call, there are some call options available to you. These call options can be seen only during a call. When a call is in progress, you can put it on hold, initiate a phone conference, mute your microphone etc.
Touch Go to the key pad Touch To turn on/off the speaker. Touch Mute your voice so that the other party cannot hear you. Touch To place a call on hold. Touch Open dial pad to dial the second call.
call prefix of that country. You can make an international call according to the following typing order: + › country code › complete phone number › dialing icon (type in the prefix code, and then continue to enter the country code and complete phone number). Country code usually follows conventional practice: German is 49, Britain 44, Sweden 46 and so on. 4.5 Answer Calls Drag the icon to answer to answer an incoming call.
5.1 Add a contact 1. From your Home screen, touch People icon or find it: Application menu > People. 2. Touch . 3. Select a location to save. 4. Enter the information for the contact. 5. After you finish, touch DONE. 5.2 Import / export 1. Copy contacts from SIM to phone: Application menu > People. In contact list interface, touch > import / export. Choose SIM card >touch Next > check the phone contact > touch Next. You can choose one bye one or select all. Then touch OK.
Application menu > People. In contact list interface, touch Choose phone contact >touch Next > check the SIM > touch Next. You can choose one bye one or select all. Then touch OK. Ultimately, copy contacts successfully. 5.3 > import / export. Search contacts 1. From your Home screen, touch People icon or find it: Application menu > People. 2. Touch . 3. Input to keyword search contacts. 4. The matched contacts listed phone automatically. 5.
Accounts: You can synchronize your phone contacts with a synchronization account. Settings: change the display options. Share visible contacts: You can share contacts via Bluetooth, Email, MMS, and so on. 5.5 Contact groups You can assign contacts to groups to get quicker access to them from the Contacts application. It allows you to create a new group such as VIP, schoolmate, friends, family or co-worker. To create a new group 1.
5.6 Favorites You can set contacts as favorites so that you can get access to them from the Contacts application. Only the contacts stored in phone memory can be set as favorites. To set a contact as favorite 1. From your Home screen, touch Contacts icon or find it: Application menu > Contacts. 2. From contacts list, touch a contact which you want to set as favorite. 3. Touch . If you want to cancel the favorite, touch .
1. From your Home screen, touch Messaging icon or find it: Application menu > Messaging. 2. Touch . 3. To add recipient(s), touch , then find and mark the contact name. To add more than one contact, mark the contact name for the desired recipients. You can also enter the recipient’s phone number manually. 5. Touch Type text message to enter your message text. 6. If you want to insert a media file, touch , and select an attachment. 7.
6.3 Forward a message 1. From your Home screen, touch Messaging icon or find it: Application menu > Messaging. 2. Touch the conversation containing the message you want to forward. 3. Touch and hold the message you want to forward. 4. Touch Forward in the menu that opens. 5. Add recipient(s), touch , then find and mark the contact name. To add more than one contact, mark the contact name for the desired recipients. You can also enter the recipient’s phone number manually. 6. Touch to send the message.
7 Web application 7.1 Wi-Fi Networks Wi-Fi is a wireless networking technology that can provide internet access at distance of up to 100 meters. To use Wi-Fi on your phone, you access a wireless access point, or “hotspot”. Some hotspots are open and you can simply connect to them. Others are hidden or implement other security features, so you must configure your phone so it can connect to them. TIP: Turn off Wi-Fi when you are not using it, to extend the life of your battery.
Use your web browser to view and navigate web pages, add pages as bookmarks, and save pages for offline reading. You can open several windows at the same time and switch among them easily. You can also request the desktop version of a web page if you don’t want to view the mobile version. Open the web browser From your Home screen, touch Browser icon or find it: Application menu > Browser. Search and address bar 8 Multimedia 8.1 Camera Take a photo or record a video with the camera in your phone.
8.2 Music The phone comes with a Music player that plays songs, listen to audio book and podcasts you have stored. It gives you a host of setting options to make your listening experience interesting. 8.3 Video player Play video. Enter the video list, scroll the screen to browse and choose the file you want to play.
8.4 FM Radio The phone comes with an in-built FM Radio. You can listen to FM radio stations, and add them to channel list. You have to plug in an earphone, as the antenna of the FM radio. You can listen to the radio either through an earphone, or through the speaker in the phone. 8.5 Sound Recorder Through the sound recorder function, you can record audio files.
9 Other application 9.1 Clock The clock allows you to view time and date. You can also add an alarm, set the alarm and turn it on. Then, the alarm can ring at a specific time you set. Add an alarm 1. From your Home screen, touch Launcher icon, then find it: Application menu > Clock. 2. Touch . 3. Touch . 4. You need choose time. After you finish setting, touch “Done”, and set time, ringtone, repeat, vibrate, etc. 5. Then the alarm can ring at a specific time you set.
9.2 Calculator Keep your calculations on your finger tips with the calculator. Using this application allows you to make calculations. The calculator provides the basic arithmetic functions; addition, subtraction, multiplication, and division. You can also use an advanced panel. 9.3 File manager You can manage files, including Download, Music, and Received File. Press Add folder icon to create a new folder or select folders to copy, move and delete. 9.
Gmail, also known as Google Mail, is a free email service with innovative features like "conversation view" email threads. You need a Gmail account. After login Gmail, you can send or receive Gmail. Touch” Touch “ 9.5 ” can edit Gmail, input recipient, subject and Gmail content. ” send the Gmail. Wi-Fi hotspot 1. From your home screen, touch Settings icon, then find it: Application menu > Settings > More… > Tethering & Portable hotspot > Wi-Fi hotspot. 2.
Frequently Occurring Problems Poor reception Echo or noise Cause Using the Smart Phone in an area with poor reception such as near tall buildings or in a basement where radio waves cannot be transmitted. Try to avoid. Using the Smart Phone when the network is busy, such as during rush hour, when the lines are full making it impossible to get through. Try to avoid. Related to the distance from the base station built by the network.
Unable to make a call Using the call bar function Cancel the call bar function. Using the fixed dial function. Cancel setting. Incorrect PIN number Consecutively enter the password three times. wrong Contact your network provider. Unable charge The Battery or charger is damaged. Replace the battery or charger. Recharging in the environment of less than -100c or higher than 500c. Change the environment.
FCC RF EXPOSURE INFORMATION: WARNING!! Read this information before using your phone In August 1986 the Federal Communications Commission (FCC) of the United States with its action in Report and Outer FCC 96-326 adopted an updated safety standard for human exposure to radio frequency (RF) electromagnetic energy emitted by FCC regulated transmitters. Those guidelines are consistent with the safety standard previously set by both U.S. and international standards bodies.
(2) this device must accept any interference received, including interference that may cause undesired operation. NOTE: The manufacturer is not responsible for any radio or TV interference caused by unauthorized modifications to this equipment. Such modifications could void the user’s authority to operate the equipment. NOTE: This equipment has been tested and found to comply with the limits for a Class B digital device, pursuant to part 15 of the FCC Rules.