
Specification Sheet


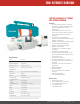


SMART NC-100
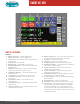
SMART NC-100 CONTROL
Features
1. Hydraulic System Start — Starts the hydraulic motor.
2. Hydraulic System Stop — Stops the hydraulic motor.
3. Saw Blade Start — Press this button to start saw blade after work
piece is clamped.
4. Saw Blade Stop — Stops saw blade.
5. Worklight ON/OFF — turn worklight on or off each press.
6. AUTO/Manual Mode Button — This button switches between Auto
and Manual mode.
7. Material Retract 2mm ON/OFF — When active the machine will
retract the material 2mm after completing each cut.
8. Single/Bundle Cutting Mode — Used to switch between single or
bundle cutting mode.
9. Coolant ON/OFF — Press this button to turn coolant on or off.
10. Slow Material Feeding Mode — Used only when in manual
mode cutting.
11. System Parameter Setting — Press this button to set up
system parameters.
12. Cutting Parameter Setting — Press this button to display cutting
related information.
13. Cutting Program Setting — Press this button to directly enter the
cutting job program set up page.
14. Material Cutting Reference — This 2 page reference chart lists out
the required blade speed and cutting rate for each material.
15. PLC Monitor — Show current PLC signals.
16. Error Report — List a historical report of the errors.
17. Saw Blade Up Indicator — Indicates the saw blade is rising.
18. Saw Blade Down Indicator — Indicates that a cut is completed and
the saw blade is at its lowest position.
19. Rear Vise Status Indicator — Indicates if the rear vises have
clamped and secured the workpiece.
20. Front Vise Status Indicator — Indicates if the front vises have
clamped and secured the workpiece.
21. Feeding Movement Indicator — When the feeding vise reaches the
front limit, the vise set icon will turn solid white.
22. Feeding Length Display — Displays current feeding length while the
material is being fed.
23. Blade Speed Display — Displays current blade speed.
24. Error Display — Displays error messages in the order of occurrence.
25. Trim Cut ON/OFF — This selection only works with the automatic
cutting mode. When under auto mode and before proceeding with
your automatic cutting jobs, select +0 if you wish the rst cut to
be “trim cut” (trims the edge of your material without the cut being
counted into the nish cuts). Selecting +1 will not trim the edge and
the rst cut will be counted.
30
Horizontal Bandsaws Product Catalog