LOG SPLITTER 4 Tonne Force MODEL NO: Log Buster 3 PART No: 3402020 OPERATION & MAINTENANCE INSTRUCTIONS 0205
Thank you for purchasing this CLARKE Log Buster. Before attempting to use the machine, please read this manual thoroughly and follow the instructions carefully. In doing so you will ensure the safety of yourself and that of others around you, and you can look forward to the log buster giving you long and satisfactory service. CLARKE GUARANTEE This CLARKE product is guaranteed against faulty manufacture for a period of 12 months from the date of purchase. Please keep your receipt as proof of purchase.
Check List Before commencing to assemble your log splitter, please check for shortages and or damage, any discrepancies should be reported to the Clarke dealer where the machine was purchased as soon as possible. Double Ended Spanners 2 off 10mm x 12mm & 1 off 13mm x 16mm. 1 Off, Operating and Maintenance Instructions. 1 Off, Log splitter (main body including motor and oil pump). 1 Off, Safety Cover (Item 70). 2 Off, Handle assembly (Items 60 & 61).
Safety Precautions WARNING: As with all machinery, there are certain hazards involved with their operation and use. Exercising respect and caution will considerably lessen the risk of personal injury. However, if normal safety precautions are overlooked or ignored, personal injury to the operator or damage to property, may result. 1. ALWAYS Learn the machines applications, limitations and the specific potential hazards peculiar to it. Read and become familiar with the entire operating manual. 2.
Extra Precautions for Log Splitters Extra special care is required when using this powerful tool to safeguard yourself and that of others around you. • Before using the log splitter, check for fluid leaks. Be sure the tool and the work area around it is clean and free of oil spills. Hydraulic fluid can create hazards, causing you to slip and fall, your hands to slip while using the machine, and it is also a potential fire hazard.
• If the log moves away from the blade, retract the ram and rotate the log through 90O as shown in Fig. 3. • Do not attempt to load the log in the machine whilst the log pusher is in motion, you could get trapped and injured. • Keep your hands well away from any splits and cracks which open in the log; these may close suddenly and crush your fingers. Fig. 3 Never attempt to split a log for longer than 5 seconds.
Electrical Connections This product is provided with a standard 13 amp, 230 volt (50Hz), BS 1363 plug, for connection to a standard, domestic electrical supply. Should the plug need changing at any time, ensure that a plug of identical specification is used.
Assembly With the assistance of another person, carefully remove all contents from the carton, carefully lay out and check for shortages or damage etc, ref check list on page 2. Any discrepancies should be reported to the Clarke dealer where the machine was purchased. Safety Cover Handle Main Body inc Motor and Oil Pump Operating Handles Fig. 5 Legs Wheel Assy Spanners Nuts Bolts & Washers Instruction Manual Assemble as follows: 1. Carefully turn the main body onto its back (Fig.
2. Attach the legs to the body using nuts bolts and washers supplied (Fig. 7), loosely fit both nuts and bolts, line up legs and tighten bolts. 3. Attach the handle to the front legs using screws, nuts and washers supplied Fig. 8. NOTE: insert screw with washer through the handle and secure to the legs with locknut. DO NOT Overtighten. Fig. 7 Fig. 8 Domed Nuts 4. Loosen and remove 2 domed nuts Fig. 9, store safely for re-use. Fig. 9 4. Fig.
5. Carefully turn the machine over onto its feet. Stand the log splitter on a firm level surface, attach the handles by screwing onto short shafts in a clockwise direction (Fig. 11). Tighten handles using spanner supplied, DO NOT overtighten. Fig. 11 6. Attach the safety cover using nuts bolts and washers supplied (Fig. 12). DO NOT overtighten nuts. WARNING NEVER operate the machine with this cover removed, this is a safety cover making it necessary to use both hands to operate. Fig.
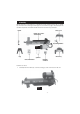
Operation Splitting Wedge Log Support Guides Log Pusher Safety Cover Motor Start/Stop Button Operating Handles Motor Oil Pump Assembly Fig. 13 • Before plugging in and switching ON, ensure the machine is sited safely on a raised flat level surface. • If possible have a truck or similar available to stack the split logs into for easy transportation to a location where the logs are to be stacked.
wobble, it must be repositioned by turning until it becomes stable. Press the motor start button, and wait for the motor to reach full speed before continuing. • Using both hands, push the operating handles down as far as possible. The log pusher will push the log into the splitting wedge, causing the log to split. • The two halves can be split again, one at a time. the operation can be repeated, until the log has been split sufficiently.
IMPORTANT: use ONLY CLARKE HYDRAULIC OIL, available from your nearest dealer. Part No: 1Ltr - 3050830 5Ltr - 3050835 3.5 Wipe the dipstick, using a clean soft cloth and check the oil level as before, and add more oil as required. 3.6 Clean the filler neck and plug/dipstick washer/seal thoroughly and refit, tighten sufficiently to prevent oil leaking, DO NOT overtighten. 3.7 Carefully return machine to normal working position. Fig. 17 3.
Trouble Shooting Problem Probable Cause Log fails to split. Remedy Incorrect positioning of the log. Reposition the log. Log exceeds permitted dimensions or wood is too hard or knotty for the capacity of the machine. Use logs of the correct specifications. Wedge not cutting. Check the splitting wedge and sharpen if necessary. Oil Leak Locate the leak and rectify, if necessary, contact your nearest Clarke dealer.
Parts Diagram -15-
Parts List Item Part No Description Qty 01 SD30001 Locking Hex Nut M14 2 02 SD30002 Hex Nut (thin) M14 4 1 03 SD30003 Piston Ram 04 SD30004 Spring 1 05 SD30005 ‘O’ Ring (oil seal) 1 06 SD30006 Piston 1 07 SD30007 ‘O’ Ring (seal 43.5 x 3.5) 1 08 SD30008 ‘O’ Ring (oil seal) 1 09 SD30009 Cylinder Body 1 1 10 SD30010 Dip Stick 11 SD30011 ‘O’ Ring (oil seal) 1 12 SD30012 Teflon Seal Ring 1 13 SD30013 ‘O’ Ring (seal 30 x 2.
Parts List Cont Item Part No Description Qty 37 SD30037 Bolt M8 x 16 2 38 SD30038 Plastic Insert 2 39 SD30039 Log Pusher Assembly 1 40 SD30040 ‘O’ Ring (seal 50 x 3.
-18-