ENCORE S20E Operator's Manual READ THIS BOOK This book has important information for the use and safe operation of this machine. Failure to read this book prior to operating or attempting any service or maintenance procedure to your ALTO machine could result in injury to you or to other personnel; damage to the machine or to other property could occur as well. You must have training in the operation of this machine before using it.
Table of Contents Operator Safety Instructions .............................................................................................. 3 Introduction & Machine Specifications ............................................................................... 5 Procedures for Transporting Machine ................................................................................ 6 Machine Control Panel .......................................................................................................
OPERATOR SAFETY INSTRUCTIONS WARNING AVERTISSEMENT ADVERTENCIA DANGER: Failure to read and observe all DANGER statements could result in severe bodily injury or death. Read and observe all DANGER statements found in your Owner's Manual and on your machine. WARNING: Failure to read and observe all WARNING statements could result in injury to you or to other personnel; property damage could occur as well. Read and observe all WARNING statements found in your Owner's Manual and on your machine.
Page WARNING: Maintenance and repairs performed by unauthorized personnel could result in damage or injury. Maintenance and repairs must be performed by authorized Clarke Technology personnel only. WARNING: Any alterations or modifications of this machine could result in damage to the machine or injury to the operator or other bystanders. Alterations or modifications not authorized by the manufacturer voids any and all warranties and liabilities.
Introduction & Machine Specifications Introduction & Machine Specifications Clarke Technology’s newly designed Encore S20E automatic scrubber is an efficient and superior floor cleaning machine. The Encore uses one brush to scrub a path 20 inches wide. A squeegee wipes the floor while the vacuum motor removes the dirty solution from the floor - all in one pass. The Encore S20E automatic scrubber comes complete with either a scrub brush or a pad driver, and one operator’s manual.
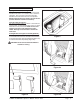
Procedures For Transporting How to Put the Machine Into a Van or Truck WARNING: This machine is heavy. Get assistance before attempting to transport or move it. Use two able persons to move the machine on a ramp or incline. Always move slowly. Do not turn the machine on a ramp. Do not stop and leave the machine on a ramp or incline. The loading ramp must be a minimum of 32" wide. WARNING: Machines can topple over if guided over the edges of stairs or loading docks and cause injury or damage.
Procedures For Transpoting (cont.) How to Remove the Machine From a Van or Truck 1. Make sure there are no obstructions in the area. 2. Make sure the unloading ramp is at least eight (8) feet long and a minimum of 32" wide, and strong enough to support the machine. 3. Make sure the ramp is clean and dry. 4. Put the ramp in position. 5. Unfasten the machine. WARNING: The machine is heavy. Make sure you use two able persons to assist in moving the machine down the ramp. 6.
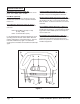
Machine Control Panel Main Switch (See Figure 1, Item "A") The main switch turns "ON" the power to the control panel. "O" is "OFF" and "I" is "ON". Control Handles (See Figure 1, Item "D") The control handles are located at the rear of the machine. They are used to guide the machine. Hour Meter (Optional) The hour meter indicates the number of hours the machine has operated. It runs only when the brush motor is on.
Machine Controls and Features Squeegee Lift Handle, See Figure 2 The squeegee lift handle is located below the control handles in the center. It is used to raise or lower the squeegee. The vac motor is turned on when the handle is lowered to either the first or last position. NOTE: Squeegee must be raised to at least the first position when the machine is backed up. Float Shut Off, See Figure 3 The shut-off switch for the vac motor is located in the recovery tank.
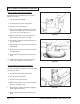
How To Prepare the Machine For Operation How To Install The Brush Or Pad Driver To install the brush or pad driver on the machine, follow this procedure: 1. Turn the main switch "OFF". 2. Put the brush lever in the "UP" position. 3. Go to the front of the machine. 4. Using a short Phillips screw driver, loosen the latch screw enough to allow the retainer to be free of the cover. (See figure 5a, 1) 5. Open the brush motor cover and remove the brush housing. See figures 5a and 5b. 1 Figure 5a 6.
How To Operate The Machine How To Operate The Squeegee The squeegee wipes the floor while the vacuum motor removes the dirty solution form the floor. Use your right hand to lower or raise the squeegee handle. To operate the squeegee, follow this procedure: 1. To lower the squeegee and start the vac motor, move the squeegee lever to the right and down. See figure 6. 2. To raise the squeegee, lift the squeegee lever up. See figure 7.
How To Operate The Machine Operating The Machine 1. Move the machine in a straight direction, forward and backward. 2. Stop the machine safely. 3. Turn the machine both left and right and return to a straight direction. To move the machine, follow this procedure: 1. Release the parking brake (if equipped with machine). 2. Turn the main switch to the "ON" position Figure 8 3. Raise the brush to the highest setting. 4. Raise the squeegee. 5. Hold the control handle as shown in figure 8. 6.
ENCORE S20E Section II Parts and Service Manual (74839B) CLARKE TECHNOLOGY Operator's Manual -Encore S20E Page -13-
HOW TO CORRECT PROBLEMS IN THE MACHINE PROBLEM There is no solution flow. The solution flow does not stop. The machine does not remove all the water from the floor. Page -14- CAUSE ACTION The solution valve is closed. Open the solution valve. There is an obstruction in the solution hose or filter. Remove the obstruction from the hose and the filter. The solution valve or electric wiring is damaged. Repair or replace the valve and the electric wiring. The solution tank is empty.
PROBLEM The cleaning is not even. CAUSE ACTION The scrub brush or pad is worn. Replace the scrub brush or pad. There is damage to the brush assembly, caster or the solution valve. Have an authorized service person make the needed repairs. The brush motor is not running Check for tripped breaker. Reset. Check for loose connections. The solution level is low. Fill the solution tank. NOTE: If the problem continues consult an authorized service person. The machine does not run.
MAINTENANCE DANGER: Maintenance and repairs performed by unauthorized personnel could result in damage or injury. Maintenance and repairs must be done by authorized Clarke Technology personnel only. DANGER: Operating a machine that is not completely or fully assembled could result in injury or property damage. Do not operate this machine until it is completely assembled. Inspect the machine carefully before operation. Keep all fasteners tight.
MAINTENANCE Do These Procedures When You Begin Your Work Period NOTE: Always engage the parking brake (if equipped) before servicing the machine. Keep the machine clean. It will need fewer repairs and have a longer life. 1. Connect machine power cord to electrical outlet. 2. Make sure the recovery tank lid is on correctly. See figure 1. A 3. Make sure the Screen filter over the vacuum motor is clean and in position. See figure 1 (a) 4. Make sure the valves on the drain hoses are clean.
MAINTENANCE Do These Procedures When You End Your Work NOTE: Always engage the parking brake (if equipped) before servicing the machine. 1. Drain the solution tank (Figure 2 ) and the recovery tank (Figure 3). To drain the tanks , follow this procedure: a. Turn the main switch “OFF”. b. Remove the drain hose from the back of the machine. c. Put the end of the hose over a drain or bucket. Figure 2 d. Turn the valve handle to the left. Pull the handle out to open the drain.
MAINTENANCE 2. Check and clean the filter screen in the solution hose. To clean the screen, follow this procedure: (See figures 11 and 12 page 18) a. Turn the connector to the left. b. Remove and clean the filter screen. c. Install the filter screen in the hose. Turn the connector to the right to connect the hose. 3. Use a grease gun to lubricate the caster. See figure 6. 4. Check the squeegee and the scrub brush or the pad driver for damage. 5.
MAINTENANCE How To Adjust The Squeegee cont. Adjusting Squeegee Tilt: The tilt of the squeegee causes the rear blade to raise up in the center or on the ends, depending on which direction the tilt is changed. For tilt adjustment, refer to figure 9. Loosen left and right screw "X". In order to bring the rear blade down in the center, tip "Y" down. To bring both ends down, tip "Y" up. Make very small adjustments and try it until a uniform flare is achieved.
115 Volt 230 Volt 00901A Encore S20E 7/00 Machine Variables and Accessories Breakdown: 00900A Encore S20E 115V Base Machine 51447D 20" Polypropylene Brush 00902A Breakdown: 00900A 51453D Encore S20E 115V Base Machine Pad Driver 00911A Breakdown: 00910A 51447D Encore S20E 230V Base Machine 20" Polypropylene Brush 00912A Breakdown: 00910A 51453D Encore S20e 230V Base Machine Pad Driver Accessories Description Part No.
ALTO® PRODUCT SUPPORT BRANCHES U. S. A. Locations CORPORATE OFFICE ALTO U.S. Inc., St. Louis, Missouri 16253 Swingley Ridge Road, Suite 200 Chesterfield, Missouri 63017-1725 PRODUCTION FACILITIES ALTO U.S. Inc., Springdale, Arkansas 2100 Highway 265 Springdale, Arkansas 72764 (479) 750-1000 Customer Service - 1-800-253-0367 Technical Service - 1-800-356-7274 ALTO U.S. Inc., Bowling Green, Ohio 43402 1100 Haskins Road SERVICE FACILITIES ALTO U.S. Inc.
CLARKE TECHNOLOGY U.S. WARRANTY This Clarke Technology Industrial/Commercial Product is warranted to be free from defects in materials and workmanship under normal use and service for a period of one year from the date of purchase, when operated and maintained in accordance with Clarke Technology's Maintenance and Operations Instructions. This warranty is extended only to the original purchaser for use of the product.