
Installation Sheet


8
Freestanding Bath Installation Instructions
1. Tip the tub over to install the drain and overflow if applicable. Use care not to damage the solid
surface/acrylic finish by using suitable material to protect the finish of the tub.
2. For non-integral overflow tubs, install the drain and overflow per manufacturer’s instructions.
For integral overflow tubs, install the drain per manufacturer’s instructions. We recommend the
use of clear silicone to seal as plumbers putty can dry and crack, leaving opportunity for leaking.
Plumber’s putty may also discolor the tub or drain finish over time.
3. The tub bottom must be supported by a setting compound such as setting compound or mortar.
Fast curing materials are not recommended due to potential excessive shrinkage. For those
models with an integral supporting lip on the bottom of the tub, the setting compound should fill
the area inside the integral supporting lip. For those models without and integral supporting lip,
the setting compound should fill the area up to 1” from the outside edge of the sump. Using
setting compound completely to the outside edge of the sump on models without an integral
supporting lip may result in bedding material being visible after installation. A sheet of plastic
film both under and on top of the setting compound is recommended as a barrier.
4. Put the bedding material in place and set the tub in place while the compound is still soft and will
conform to the tub bottom. Avoid getting bedding material on the drain/overflow connections.
The tub should be worked on into the compound. Partially filling the tub with water is sometimes
used to help insure proper setting of the tub.
5. Verify the tub is level before the setting material hardens.
6. Once the tub is set, make final plumbing connections as required.
7. If you are installing the spout or faucets on the deck of the tub, mark the proper location first.
Drill a pilot hole from the solid surface/acrylic finished side and then use a properly sized hole saw
to drill the holes from the solid surface/acrylic finished side.
8. Attach the remaining plumbing and clean all dirt and debris from the tub. Proper cleaning
instructions can be found in the Cleaning and Maintenance section of these instructions.
9. Do a water test of the tub again to insure the bath is leak free. Allow 24 hours before putting the
bath into service.
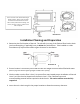
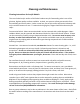
Dune shown here
Setting
Compounds
or mortar mix
must be used underneath the tub
for total support of tub.