
Web Publishing Installation Guide


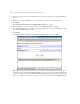


Table Of Contents
- Chapter 1 Before you begin
- Using FileMaker Server documentation
- Customer support
- About the license key
- Hardware and software requirements
- Windows requirements for the Web Publishing Engine
- Mac OS requirements for the Web Publishing Engine
- Windows requirements for FileMaker Site Assistant and FileMaker CDML Converter tools
- Mac OS requirements for FileMaker Site Assistant and FileMaker CDML Converter tools
- Important note about supported operating systems
- About the Web Publishing Engine software components
- About the tools for developing XSLT stylesheets
- Overview of installing, configuring, and using the Web Publishing Engine
- Installing the Web Publishing Engine in various host configurations
- Registering the Web Publishing Engine in FileMaker Server
- Installing plug-ins for the Web Publishing Engine
- Chapter 2 Installing the Web Publishing Engine in Windows
- Chapter 3 Installing the Web Publishing Engine in Mac OS X
- Chapter 4 Configuring the Web Publishing Engine
- About the Web Publishing Engine Administration Console
- General steps for configuring the Web Publishing Engine
- Configuring the Web Publishing Engine for the first time
- Configuring Instant Web Publishing
- Disabling Custom Web Publishing with XML
- Configuring Custom Web Publishing with XSLT
- Setting the Web Publishing Engine mode
- Setting server-side XSLT stylesheet caching
- Configuring the interaction between web sessions and database sessions
- Configuring access to a mail server for the Web Publishing Engine
- Setting the default text encoding for XSLT requests
- Disabling Custom Web Publishing with XSLT
- Specifying general settings for the Web Publishing Engine
- Restricting access to the Administration Console
- Viewing a list of the published databases for FileMaker Server
- Logging out of the Administration Console
- Using the Web Publishing Engine and Administration Console services
- Changing the user name and password for the Administration Console
- Where to go from here
- Index
32 FileMaker Server Advanced Web Publishing Installation Guide
3. As necessary, set the following options for Custom Web Publishing with XSLT:
1 Web Publishing Engine mode of operation: See “Setting the Web Publishing Engine mode” on page 41.
1 server-side stylesheet caching: See “Setting server-side XSLT stylesheet caching” on page 43.
1 database sessions: See “Configuring the interaction between web sessions and database sessions” on
page 43.
1 SMTP email server settings: See “Configuring access to a mail server for the Web Publishing Engine”
on page 44.
1 default text encoding settings: See “Setting the default text encoding for XSLT requests” on page 45.
4. As necessary, set the following general settings for the Web Publishing Engine:
1 log file settings: See “Specifying logging options for the Web Publishing Engine” on page 46.
1 session time-out settings: See “Setting the session time-out for the Web Publishing Engine” on page 47.
5. As necessary, restrict access to the Administration Console from particular IP addresses. See “Restricting
access to the Administration Console” on page 49.
Configuring the Web Publishing Engine for the first time
The first time you use the Administration Console to configure the Web Publishing Engine, you must specify
two sets of user names and passwords:
1 a user name and password for the Administration Console, which are used to authenticate web users who
attempt to use the Administration Console. This user name and password prevent unauthorized users from
using the Administration Console to take over control of your Web Publishing Engine.
1 a user name and password for the Web Publishing Engine, which are used to authenticate the
Administration Console software component when it accesses the Web Publishing Engine. This user name
and password prevent unauthorized users from installing another copy of the Administration Console and
taking over control of your Web Publishing Engine.
Note The system language of the host computer where you run the Administration Console for the first time
sets the default status area language for Instant Web Publishing and the default text encoding for Custom Web
Publishing with XSLT on the Web Publishing Engine. You can change these default settings for the Web
Publishing Engine by using the Administration Console.