
Web Publishing Installation Guide
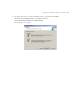
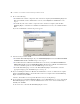


Table Of Contents
- Chapter 1 Before you begin
- Using FileMaker Server documentation
- Customer support
- About the license key
- Hardware and software requirements
- Windows requirements for the Web Publishing Engine
- Mac OS requirements for the Web Publishing Engine
- Windows requirements for FileMaker Site Assistant and FileMaker CDML Converter tools
- Mac OS requirements for FileMaker Site Assistant and FileMaker CDML Converter tools
- Important note about supported operating systems
- About the Web Publishing Engine software components
- About the tools for developing XSLT stylesheets
- Overview of installing, configuring, and using the Web Publishing Engine
- Installing the Web Publishing Engine in various host configurations
- Registering the Web Publishing Engine in FileMaker Server
- Installing plug-ins for the Web Publishing Engine
- Chapter 2 Installing the Web Publishing Engine in Windows
- Chapter 3 Installing the Web Publishing Engine in Mac OS X
- Chapter 4 Configuring the Web Publishing Engine
- About the Web Publishing Engine Administration Console
- General steps for configuring the Web Publishing Engine
- Configuring the Web Publishing Engine for the first time
- Configuring Instant Web Publishing
- Disabling Custom Web Publishing with XML
- Configuring Custom Web Publishing with XSLT
- Setting the Web Publishing Engine mode
- Setting server-side XSLT stylesheet caching
- Configuring the interaction between web sessions and database sessions
- Configuring access to a mail server for the Web Publishing Engine
- Setting the default text encoding for XSLT requests
- Disabling Custom Web Publishing with XSLT
- Specifying general settings for the Web Publishing Engine
- Restricting access to the Administration Console
- Viewing a list of the published databases for FileMaker Server
- Logging out of the Administration Console
- Using the Web Publishing Engine and Administration Console services
- Changing the user name and password for the Administration Console
- Where to go from here
- Index
24 FileMaker Server Advanced Web Publishing Installation Guide
Setting up authentication for a Windows IIS web site
FileMaker Server handles the authentication for password-protected databases. You can choose whether you
want to also use IIS web site authentication in addition to FileMaker Server authentication.
You must decide whether you want to use IIS web site authentication and take the appropriate steps before
using the Administration Console for the first time to configure the Web Publishing Engine.
You can choose from the following scenarios:
1 Disable IIS authentication. You can disable all IIS authentication methods and use anonymous access to
the IIS site. This is the simplest configuration. See the next section, “Disabling IIS authentication.”
1 Leave IIS authentication enabled and also enable Basic Authentication. You can leave the current IIS
authentication methods enabled for use with other web sites, and use Basic Authentication for the Web
Publishing Engine. You must also set up Windows user accounts that exactly match the user accounts for
the Web Publishing Engine and web-published FileMaker databases. See “Enabling IIS authentication” on
page 25.
For information on IIS, see the IIS online documentation by entering http://localhost/iisHelp in your web
browser.
Disabling IIS authentication
If you disable all IIS authentication methods and use anonymous access to the IIS site, then you don’t need
to add any Windows user accounts.
To disable IIS authentication:
1. In Internet Information Services, select the web site and choose Action menu > Properties.
2. In the Directory Security properties sheet, click Edit for authentication methods.
3. In the Authentications Methods dialog box, do the following:
1 Select Anonymous access.
1 Disable all of the authentication methods under Authenticated access.
4. Click OK to close the Authentications Methods dialog box.
5. Click OK to close the Directory Security properties sheet.