
Custom Web Publishing Guide
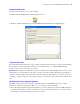

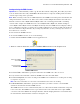


Table Of Contents
- Chapter 1 Introducing Custom Web Publishing
- Chapter 2 Preparing databases for Custom Web Publishing
- Chapter 3 Accessing XML data with the Web Publishing Engine
- Using Custom Web Publishing with XML
- General process for accessing XML data from the Web Publishing Engine
- About the URL syntax for XML data and container objects
- Accessing XML data via the Web Publishing Engine
- Using the fmresultset grammar
- Using other FileMaker XML grammars
- About UTF-8 encoded data
- Using FileMaker query strings to request XML data
- Switching layouts for an XML response
- Understanding how an XML request is processed
- Using server-side and client-side processing of stylesheets
- Troubleshooting XML document access
- Chapter 4 Introduction to Custom Web Publishing with XSLT
- Chapter 5 Developing FileMaker XSLT stylesheets
- Using XSLT stylesheets with the Web Publishing Engine
- About the FileMaker XSLT Extension Function Reference
- About the URL syntax for FileMaker XSLT stylesheets
- About the URL syntax for FileMaker container objects in XSLT solutions
- Using query strings in FileMaker XSLT stylesheets
- Specifying an XML grammar for a FileMaker XSLT stylesheet
- About namespaces and prefixes for FileMaker XSLT stylesheets
- Using statically defined query commands and query parameters
- Setting text encoding for requests
- Specifying an output method and encoding
- About the encoding of XSLT stylesheets
- Processing XSLT requests that do not query FileMaker Server
- Using tokens to pass information between stylesheets
- Using the FileMaker XSLT extension functions and parameters
- About the FileMaker-specific XSLT parameters set by the Web Publishing Engine
- Accessing the query information in a request
- Obtaining client information
- Using the Web Publishing Engine base URI parameter
- Using the authenticated base URI parameter
- Loading additional documents
- Using a database’s layout information in a stylesheet
- Using content buffering
- Using Web Publishing Engine sessions to store information between requests
- Using the session extension functions
- Sending email messages from the Web Publishing Engine
- Using the header functions
- Using the cookie extension functions
- Using the string manipulation extension functions
- Comparing strings using Perl 5 regular expressions
- Checking for values in a field formatted as a checkbox
- Using the date, time, and day extension functions
- Checking the error status of extension functions
- Using logging
- Chapter 6 Testing and monitoring a site
- Appendix A Valid names used in query strings
- About the query commands and parameters
- Using the query commands
- -dbnames (Database names) query command
- -delete (Delete record) query command
- -dup (Duplicate record) query command
- -edit (Edit record) query command
- -find, -findall, or -findany (Find records) query commands
- -layoutnames (Layout names) query command
- -new (New record) query command
- -process (Process XSLT stylesheets)
- -scriptnames (Script names) query command
- -view (View layout information) query command
- Using the query parameters
- -db (Database name) query parameter
- -encoding (Encoding XSLT request) query parameter
- -field (Container field name) query parameter
- fieldname (Non-container field name) query parameter
- fieldname.op (Comparison operator) query parameter
- -grammar (Grammar for XSLT stylesheets) query parameter
- -lay (Layout) query parameter
- -lay.response (Switch layout for response) query parameter
- -lop (Logical operator) query parameter
- -max (Maximum records) query parameter
- -modid (Modification ID) query parameter
- -recid (Record ID) query parameter
- -script (Script) query parameter
- -script.prefind (Script before Find) query parameter
- -script.presort (Script before Sort) query parameter
- -skip (Skip records) query parameter
- -sortfield (Sort field) query parameter
- -sortorder (Sort order) query parameter
- -styletype (Style type) query parameter
- -stylehref (Style href) query parameter
- -token.[string] (Pass values between XSLT stylesheets) query parameter
- Appendix B Error codes for Custom Web Publishing
- Appendix C Converting CDML solutions to FileMaker XSLT
- About the process of converting CDML solutions to FileMaker XSLT solutions
- Conversion of CDML action tags, variable tags, and URLs
- Conversion of the -error and -errornum CDML variable tags
- Conversion of obsolete CDML action tags
- Conversion of supported CDML action tags
- Conversion of obsolete CDML variable tags
- Conversion of supported CDML variable tags
- Conversion of CDML boolean parameters to XPath boolean parameters
- Conversion of CDML boolean operators to XPath
- Conversion of CDML intratag parameters to XSLT-CWP
- Manually fixing CDML conversion errors
- Conversion of CDML replacement tags to XSLT-CWP
- Index

Introduction to Custom Web Publishing with XSLT 41
Starting the Site Assistant
To start the Site Assistant, do one of the following:
1 Double-click the FileMaker Site Assistant application icon.
1 Windows: Click the Start button, and choose FileMaker Site Assistant from the Programs menu.
Using the Site Assistant
For detailed information and step-by-step procedures for using the Site Assistant, see the Site Assistant Help.
For information about using the Site Assistant’s generated stylesheets, see
“Using FileMaker XSLT
stylesheets in a web site or program” on page 45.
Important When using the Site Assistant, if you select a database that contains multiple tables, be sure to select
layouts that are associated with the same table or else the generated site will return unexpected results. For
example, a database might contain a Products table and a Customers table. When you select the layouts for a
search page, an edit records page, and an add records page, be sure the layouts are all associated with the same
table.
About the Site Assistant’s generated stylesheets
The XSLT stylesheets generated by the Site Assistant include several FileMaker-specific processing
instructions, elements, and parameters. Here are a few examples of what is included:
1 The <?xslt-cwp-query params="query string-fragment"?> processing instruction specifies the XML grammar to
use and statically defines the name of the database you chose in the Site Assistant. See “Using statically
defined query commands and query parameters” on page 51.
FileMaker Site Assistant