
Tutorial


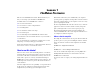


Table Of Contents
- Lesson 1 FileMaker Pro basics
- Lesson 2 Browsing information
- Lesson 3 Finding and sorting records
- Lesson 4 Creating a database and entering records
- Lesson 5 Customizing what you see
- Lesson 6 Creating lists, mailing labels, and form letters
- Lesson 7 Simplifying data entry
- Lesson 8 Automating tasks with buttons and scripts
- Lesson 9 Creating and running reports
- Lesson 10 Making databases relational
- Lesson 11 Sharing and exchanging data
- Lesson 12 Protecting data in FileMaker Pro
- Lesson 13 Keeping your data safe

Lesson 1 | FileMaker Pro basics 9
About FileMaker Pro modes
When you work in FileMaker Pro, you work in one of four modes.
1 Use Browse mode to enter data and view records.
1 Use Find mode to locate a record or a group of records quickly.
1 Use Layout mode to specify how information will appear on the
screen or when you print it.
1 Use Preview mode to see what the pages will look like when you
print them.
Once you have opened a database, you can switch from one mode to
another using either the View menu, mode buttons, or the mode pop-
up menu at the bottom of the application window.
For more information
For more information on FileMaker Pro basic concepts, see chapter 2
of the FileMaker Pro User’s Guide.
You can also find comprehensive information about procedures and
concepts in FileMaker Pro Help. To access FileMaker Pro Help,
choose Help menu > FileMaker Pro Help.
To access the FileMaker Learning Center on the web,
choose Help menu > Learning Center.
Name of layout
Number of the
current record
Fields
Filename
Mode buttons
Current mode
(Browse)
Mode pop-up menu