
Tutorial
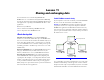
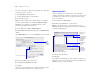
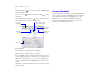
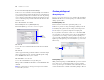
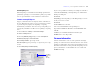

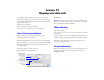
Table Of Contents
- Lesson 1 FileMaker Pro basics
- Lesson 2 Browsing information
- Lesson 3 Finding and sorting records
- Lesson 4 Creating a database and entering records
- Lesson 5 Customizing what you see
- Lesson 6 Creating lists, mailing labels, and form letters
- Lesson 7 Simplifying data entry
- Lesson 8 Automating tasks with buttons and scripts
- Lesson 9 Creating and running reports
- Lesson 10 Making databases relational
- Lesson 11 Sharing and exchanging data
- Lesson 12 Protecting data in FileMaker Pro
- Lesson 13 Keeping your data safe

Lesson 12 | Protecting data in FileMaker Pro 63
Extended privilege sets
Extended privilege sets determine the data sharing options that are
permitted by a privilege set, such as whether a privilege set permits
users to open a shared file or view a database in a web browser.
Create a custom privilege set
Suppose your business relies on temporary staff at certain times of
the year. This staff needs to have access to your data, but you want
to prevent temporary employees from printing or exporting
information in your database. You can create a specific privilege set
for temporary staff that does not allow access to printing or exporting
data.
1. Choose File menu > Manage > Accounts & Privileges.
2. Click the Privilege Sets tab.
3. Select the [Data Entry Only] privilege set, then click Duplicate.
4. Data Entry Only Copy is selected. Click Edit.
5. For Privilege Set Name, type Temp Staff.
6. For Description, type No printing or exporting for temp
staff.
7. Clear Allow printing and Allow exporting.
If you’ve set up a database for Sharing, for example on a network or
via Instant Web Publishing, extended privileges are enabled in the
Privilege Set dialog box.
8. Click OK.
Temp Staff appears in the privilege set list. This privilege set can be
used by one or more accounts.
9. Click OK.
10. Click Allow to close the alert.
You see the Confirm Full Access Login dialog box.
Type Admin for Full Access Account., leave Password blank, then
click OK.
11. When you are finished with this lesson, Exit or Quit
FileMaker
Pro to close all open files.
For more information
You have learned how to create accounts, passwords, and assign
privilege sets to them. You have also learned how to create custom
privilege sets and how they can be used for specific business reasons.
To learn more about how accounts, passwords, and privilege sets can
protect your databases, see the FileMaker Pro User’s Guide and
FileMaker
Pro Help.
Clear Allow
printing and
Allow
exporting
Extended privilege settings appear here