
Tutorial
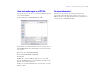

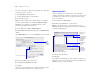
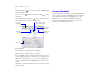
Table Of Contents
- Lesson 1 FileMaker Pro basics
- Lesson 2 Browsing information
- Lesson 3 Finding and sorting records
- Lesson 4 Creating a database and entering records
- Lesson 5 Customizing what you see
- Lesson 6 Creating lists, mailing labels, and form letters
- Lesson 7 Simplifying data entry
- Lesson 8 Automating tasks with buttons and scripts
- Lesson 9 Creating and running reports
- Lesson 10 Making databases relational
- Lesson 11 Sharing and exchanging data
- Lesson 12 Protecting data in FileMaker Pro
- Lesson 13 Keeping your data safe

60 FileMaker Pro Tutorial
9. Make sure that an appears between both the First Name fields
and the Last Name fields.
If you don’t see an between matching fields, click to change
the setting.
The remaining fields should have a between them. The data in
these fields will not be imported to the target file.
10. Click Import.
11. In the Import Options dialog box, click Import.
12. In the Import Summary dialog box, click OK.
Records in MyFile.fp7 that contain first name and last name data are
added to Sample Copy.fp7. The current found set contains the newly
imported records. Browse the new records to verify the imported
data. Choose Records menu > Show All Records to see all records in
the file.
13. When you are finished with this lesson, close the file by choosing
File menu > Close.
For more information
You have learned how to enable file sharing using FileMaker Pro
and how to import data into a FileMaker
Pro file. To learn more
about sharing and importing data in FileMaker
Pro, see the
FileMaker Pro User’s Guide and FileMaker
Pro Help. For
information about publishing databases on the web, see the
FileMaker Instant Web Publishing Guide.
Fields in the
source file
Fields in the
target file
Arrows show that data will
import into the fields at right
Import action
Source file to
import from
Target file to
import to