
Tutorial

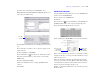

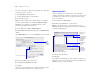


Table Of Contents
- Lesson 1 FileMaker Pro basics
- Lesson 2 Browsing information
- Lesson 3 Finding and sorting records
- Lesson 4 Creating a database and entering records
- Lesson 5 Customizing what you see
- Lesson 6 Creating lists, mailing labels, and form letters
- Lesson 7 Simplifying data entry
- Lesson 8 Automating tasks with buttons and scripts
- Lesson 9 Creating and running reports
- Lesson 10 Making databases relational
- Lesson 11 Sharing and exchanging data
- Lesson 12 Protecting data in FileMaker Pro
- Lesson 13 Keeping your data safe

Lesson 11 | Sharing and exchanging data 59
About exchanging data
You can exchange information between FileMaker Pro and other
applications by importing and exporting data. You can:
1 import data into an existing FileMaker Pro file, either into a new
table or into an existing table
1 share data with ODBC data sources
1 convert data from other applications to new FileMaker Pro files
1 export data for use in other applications
Saving and sending data
You can save FileMaker Pro data as a Microsoft Excel file or an
Adobe PDF file, allowing you to give data to users who don’t have
FileMaker
Pro. FileMaker Pro lets you email the Excel file or PDF
file when you save it. You can also create scripts to save/send records
as Excel or PDF.
FileMaker Pro can send email messages to one or more recipients.
You can manually enter recipients, the message subject, and so on,
or you can use values from fields or calculations.You can also create
scripts to send emails.
Supported import/export file formats
Most applications store data in their own file format, but most can
also exchange information using intermediary formats. For example,
FileMaker
Pro can import and/or export files in Microsoft Excel,
tab-separated text (tab), comma-separated values (csv), and XML, as
well as other formats.
If you want to exchange data with another program, check the
documentation that came with that program to determine a common
intermediary file format that both FileMaker
Pro and the other
program support.
Note Most file formats do not import or export formatting such as
font, size, style, and color.
About importing data
There are several ways to import data into an existing file. You can:
1 add new records to an existing table
1 create a new table from imported data
1 update existing records in an existing table
1 update matching records in an existing table
Important Certain import operations that update existing records and
update matching records overwrite existing data during the import
process, which cannot be undone. To safeguard your data, always
choose File menu > Save a Copy As to make a backup of the file before
you perform an import that updates records.
The file you import records from is the source. The file you import
records to is the target.
Import data into the sample file
1. Open Sample Copy.fp7 and select Data Entry from the
Layout pop-up menu.
2. Choose File menu > Import Records > File.
3. For Files of type (Windows) or Show (Mac OS), choose All files
(Windows) or All available (Mac
OS), then choose MyFile.fp7.
MyFile.fp7 is the file you created in lesson 4. This is the source file.
4. Click Open.
The Import Field Mapping dialog box appears.
5. For Target, select Current Table (“Members”).
6. For Import Action, select Add new records.
7. Make sure that the First Name field in Source Fields is on the same
row as the First Name field in Target Fields.
You can move target fields up and down in the list using the slider.
8. Repeat step 7 for Last Name.