
Tutorial
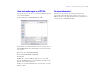

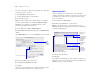
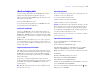
Table Of Contents
- Lesson 1 FileMaker Pro basics
- Lesson 2 Browsing information
- Lesson 3 Finding and sorting records
- Lesson 4 Creating a database and entering records
- Lesson 5 Customizing what you see
- Lesson 6 Creating lists, mailing labels, and form letters
- Lesson 7 Simplifying data entry
- Lesson 8 Automating tasks with buttons and scripts
- Lesson 9 Creating and running reports
- Lesson 10 Making databases relational
- Lesson 11 Sharing and exchanging data
- Lesson 12 Protecting data in FileMaker Pro
- Lesson 13 Keeping your data safe

Lesson 9 | Creating and running reports 51
Save and send a report as a PDF file
After you run a report, you can save it as an Adobe PDF file and send
it as an email attachment.
1. Choose File menu > Save/Send Records As > PDF.
2. For Save in, select the Tutorial folder, if it is not already selected.
3. For File Name (Windows) or Save As (Mac OS), type Membership
Fee Report.
4. For Save, choose Records being browsed.
5. Select Create email with file as attachment.
6. Click Save.
FileMaker Pro creates the PDF file and passes it to your email
program. The PDF file appears as an attachment in an email message
that you can then address and send.
7. When you are finished with this lesson, close the file by choosing
File menu
> Close.
For more information
In this lesson, you generated reports with grouped data, and
reports
with grouped data and totals. You also saved a report as a
PDF file and sent it as an email attachment. For more information on
creating reports, see FileMaker
Pro Help.