
Tutorial
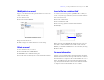

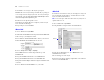
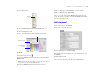


Table Of Contents
- Lesson 1 FileMaker Pro basics
- Lesson 2 Browsing information
- Lesson 3 Finding and sorting records
- Lesson 4 Creating a database and entering records
- Lesson 5 Customizing what you see
- Lesson 6 Creating lists, mailing labels, and form letters
- Lesson 7 Simplifying data entry
- Lesson 8 Automating tasks with buttons and scripts
- Lesson 9 Creating and running reports
- Lesson 10 Making databases relational
- Lesson 11 Sharing and exchanging data
- Lesson 12 Protecting data in FileMaker Pro
- Lesson 13 Keeping your data safe

28 FileMaker Pro Tutorial
6. In the Contact info tab panel, select the Company, Membership Type,
Fee Paid, Date Paid, and Member Since fields and their labels.
7. Choose Edit menu > Cut.
8. Select the Membership info tab panel.
9. Choose Edit menu > Paste Layout Object(s) (Windows) or
Paste (Mac OS).
10. With the fields and labels selected, drag to position them near the
top of the tab panel.
11. Choose View menu > Browse Mode to see your results.
Display a number as currency
You can display a number as currency, even though only the number
is typed into the field.
Formatting affects only the way data is displayed. It does not change
the data.
1. Choose View menu > Layout Mode.
2. In the Membership info tab panel, select the Fee Paid field.
3. Choose Format menu > Number.
4. Select options as shown in the following Number Format dialog box.
5. Click OK.
6. Choose View menu > Browse Mode to see the formatted data.
Note You might need to browse to another record to see formatted
data in the Fee Paid field.
Add color to a tab panel
You will change the color of the Membership info tab panel to match
the color of the header.
1. Choose View menu > Layout Mode.
2. Choose Data Entry from the Layout pop-up menu.
3. Select the Membership info tab panel.