
Tutorial
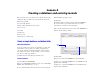

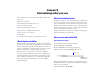
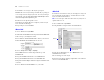
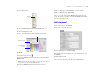


Table Of Contents
- Lesson 1 FileMaker Pro basics
- Lesson 2 Browsing information
- Lesson 3 Finding and sorting records
- Lesson 4 Creating a database and entering records
- Lesson 5 Customizing what you see
- Lesson 6 Creating lists, mailing labels, and form letters
- Lesson 7 Simplifying data entry
- Lesson 8 Automating tasks with buttons and scripts
- Lesson 9 Creating and running reports
- Lesson 10 Making databases relational
- Lesson 11 Sharing and exchanging data
- Lesson 12 Protecting data in FileMaker Pro
- Lesson 13 Keeping your data safe

Lesson 5 | Customizing what you see 27
5. Select the Text tool.
6. Select the Member Since field label and highlight the text.
7. Choose Format menu > Text.
8. Select 12 for Size, Plain for Style, and dark gray for Color.
9. Click OK.
10. Select the Selection tool .
11. Select the Member Since field, and drag it to align it with the
Date
Paid field.
Note You can use the arrow keys on your keyboard to move a
selected layout object in small increments.
12. Select the Member Since field label and repeat step 11.
13. Choose View menu > Browse Mode to see the new field.
14. Choose Records menu > New Record.
You see a year date entered in the Member Since field in the new
record. The current year will be entered in the Member Since field in
each subsequent new record.
Add a tab panel
1. Choose View menu > Layout Mode.
2. Select the Contact info tab panel.
3. Choose Format menu > Tab Control Setup.
4. In the Tab Control Setup dialog box, enter Membership info
for Tab Name.
5. Click Create, then OK.
You see the new tab panel to the right of the Contact Info tab.
Text tool
Select Plain for Style
Select 12 for Size
Select dark gray
for color