
Tutorial
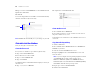

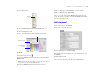


Table Of Contents
- Lesson 1 FileMaker Pro basics
- Lesson 2 Browsing information
- Lesson 3 Finding and sorting records
- Lesson 4 Creating a database and entering records
- Lesson 5 Customizing what you see
- Lesson 6 Creating lists, mailing labels, and form letters
- Lesson 7 Simplifying data entry
- Lesson 8 Automating tasks with buttons and scripts
- Lesson 9 Creating and running reports
- Lesson 10 Making databases relational
- Lesson 11 Sharing and exchanging data
- Lesson 12 Protecting data in FileMaker Pro
- Lesson 13 Keeping your data safe

26 FileMaker Pro Tutorial
7. Click Save to save changes to this layout, if prompted.
FileMaker Pro can save layout changes automatically, or prompt you
to save changes before leaving Layout mode. To save layout changes
automatically, select the Save layout changes automatically checkbox
in the Save changes to this layout dialog box.
8. In Browse mode, flip through the records.
If the field doesn’t display all names completely, return to Layout
mode and make the field larger.
9. Repeat this process for Last Name.
Move a field
1. Choose View menu > Layout Mode.
2. Click inside the Last Name field and drag it beside the First Name field.
In the next steps, you’ll align these fields.
3. Press Shift and click the First Name field to add it to your selection.
Both the First Name and Last Name fields are selected.
4. Choose Arrange menu > Align > Top Edges.
The Last Name field moves until it aligns with the top of the
First
Name field.
5. Drag the Last Name field label above the Last Name field.
6. Drag the First Name field label above the First Name field.
7. Experiment with the Align commands to align the field labels with
each other.
8. Choose View menu > Browse Mode to see your results.
Add a field
If a field has been defined in a table, you can display it on any layout
based on that table. In this database, a defined field is not on this
layout. You will add this field now.
Note You can also place fields from other tables on your layouts, as
explained in Lesson 10.
1. Choose View menu > Layout Mode.
2. Using the Field tool, drag the field to the Contact info tab.
3. In the Specify Field dialog box, select Member Since, select
Create
Label, then click OK.
The new field appears on the layout.
4. Resize the new field by dragging a right handle so the field is the
same size as the Date Paid field.
Field tool
Drag the new field