
Tutorial
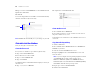
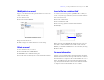

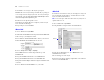


Table Of Contents
- Lesson 1 FileMaker Pro basics
- Lesson 2 Browsing information
- Lesson 3 Finding and sorting records
- Lesson 4 Creating a database and entering records
- Lesson 5 Customizing what you see
- Lesson 6 Creating lists, mailing labels, and form letters
- Lesson 7 Simplifying data entry
- Lesson 8 Automating tasks with buttons and scripts
- Lesson 9 Creating and running reports
- Lesson 10 Making databases relational
- Lesson 11 Sharing and exchanging data
- Lesson 12 Protecting data in FileMaker Pro
- Lesson 13 Keeping your data safe

Lesson 5
Customizing what you see
You can enhance the way your data looks by adding graphics and
other effects.
In this lesson, you will:
1 learn how layouts determine what you see
1 add, resize, and move fields
1 add a tab panel and change its color
1 display values in a number field as currency
1 change text size, style, and color
1 add graphics
1 see where to find other ways you can customize a layout
About layouts and tables
Each layout is based on a single table, and shows records from that
table. If your file contains only one table, all layouts in your file will
be based on that table. If your file contains more than one table, you
must choose which table your layout will use at the time you create
the layout, although you can change this later if necessary.
The table you choose as the basis for your layout is important
because it determines which fields and records are available for use
on that layout. Fields and records that are not stored in the current
table can still be used, but must be accessed through relationships.
For more information on relationships, see
lesson 10, “Making
databases relational.”
About customizing layouts
Design layouts in Layout mode. You can include any combination of
fields, text, and graphics on a layout. You can change the font and
color of fields and text and you can change the way data appears in
Number or Date fields. For example, you can set a Number field to
include currency notation or you can set a Date field to include the
day of the week with the month, day, and year.
Changes you make in Layout mode affect only the way data appears.
The data itself remains as it was entered.
Resize, move, and add a field
Select and resize a field
1. Open Sample Copy.fp7 in the Tutorial folder.
2. Choose View menu > Layout Mode.
3. Choose Data Entry from the Layout pop-up menu.
4. In Layout mode, click the First Name field to select it.
5. Drag the handle at the lower-right corner of the field to the left
until the field is smaller, yet large enough to display the longest first
name you expect in your file.
6. Choose View menu > Browse Mode.
Click and drag the
handle to resize
Click to select