
Tutorial
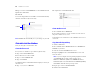
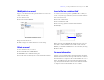

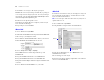
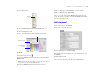


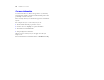
Table Of Contents
- Lesson 1 FileMaker Pro basics
- Lesson 2 Browsing information
- Lesson 3 Finding and sorting records
- Lesson 4 Creating a database and entering records
- Lesson 5 Customizing what you see
- Lesson 6 Creating lists, mailing labels, and form letters
- Lesson 7 Simplifying data entry
- Lesson 8 Automating tasks with buttons and scripts
- Lesson 9 Creating and running reports
- Lesson 10 Making databases relational
- Lesson 11 Sharing and exchanging data
- Lesson 12 Protecting data in FileMaker Pro
- Lesson 13 Keeping your data safe

22 FileMaker Pro Tutorial
12. Type Container in the Field Name box, select Container from the
Type list, then click Create.
13. Click OK.
You see the empty fields in a new, blank record. Field labels identify
the fields. Your file is ready for data entry.
Note FileMaker Pro automatically saves your changes as you work.
Enter data into the database
Now you can begin to enter members’ data.
Create the first record
1. If you don’t see field boxes, press Tab to begin data entry.
2. Type Jane in the First Name field.
3. Press Tab to move to the next field.
4. Type Doe in the Last Name field.
5. Type 25 in Fee Paid.
You will learn how to format number fields to display as currency in
the next lesson.
6. Type 11/11/2009 in Date Paid.
The completed record should look like this:
Create another record
1. Choose Records menu > New Record.
2. As you did for Jane Doe’s record, enter data for John Smith,
who paid 75 dollars on 2/2/2009.
Your database now contains two records. Click the book icon to see
each record.
Copy data with drag and drop
1. Switch to View as List.
2. Choose Records menu > New Record and enter a First Name and
Last
Name of your choice.
3. Select the text in the Fee Paid field in record 2.
4. Drag the highlighted text to the Fee Paid field in record 3 and
release the mouse.
Note If you can’t drag the text, drag and drop might not be turned
on in FileMaker
Pro. To turn on drag and drop, choose
Edit
menu > Preferences (Windows) or FileMaker Pro menu >
Preferences (Mac
OS). Under General, select Allow drag and drop
text selection, click OK, then repeat steps 3 and 4.
5. Repeat steps 3 and 4 for the Date Paid field.
6. Switch back to View as Form.
Field labels
Enter data here