
Tutorial
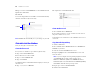

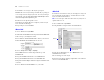
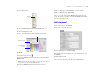


Table Of Contents
- Lesson 1 FileMaker Pro basics
- Lesson 2 Browsing information
- Lesson 3 Finding and sorting records
- Lesson 4 Creating a database and entering records
- Lesson 5 Customizing what you see
- Lesson 6 Creating lists, mailing labels, and form letters
- Lesson 7 Simplifying data entry
- Lesson 8 Automating tasks with buttons and scripts
- Lesson 9 Creating and running reports
- Lesson 10 Making databases relational
- Lesson 11 Sharing and exchanging data
- Lesson 12 Protecting data in FileMaker Pro
- Lesson 13 Keeping your data safe

Lesson 4
Creating a database and entering records
In the previous lessons, you saw how to use a simple database with
existing data. Now you will create your own file and add records.
In this lesson you will:
1 create a simple database
1 define fields to hold different types of data
1 create records
1 enter data
1 modify data
1 delete records
1 insert data in a container field
Create a simple database and define fields
About field definitions
You create a field for each category of information you want, such
as First Name or City. To find, sort, calculate, and display data
correctly, the field type should match the kind of data it contains
(text, number, date, and so on). For example, you can’t search for
text values in a field of type Number.
You will learn about other field types in later lessons.
Create a database
1. Choose File menu > New Database.
2. If you see the FileMaker Quick Start Screen, choose Create empty
database, then click OK. If not, go to step 3.
3. Go to the Tutorial folder and select it as the location for this file.
4. For File name, type MyFile.fp7.
5. Click Save.
The Manage Database dialog box appears. By default, FileMaker
Pro creates a table for you, with the same name as your file.
You will now create fields to store information.
6. To create the first field, type First Name in the Field Name box.
7. Notice that the field type is Text.
8. Click Create.
9. Type Last Name in the Field Name box, then click Create.
10. Type Fee Paid in the Field Name box, select Number from the
Type
list, then click Create.
11. Type Date Paid in the Field Name box, select Date from the
Type list, then click Create.
Specify the field type
Name
a field