
Tutorial
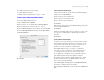
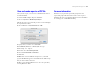


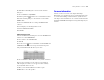

Table Of Contents
- Lesson 1 FileMaker Pro basics
- Lesson 2 Browsing information
- Lesson 3 Finding and sorting records
- Lesson 4 Creating a database and entering records
- Lesson 5 Customizing what you see
- Lesson 6 Creating lists, mailing labels, and form letters
- Lesson 7 Simplifying data entry
- Lesson 8 Automating tasks with buttons and scripts
- Lesson 9 Creating and running reports
- Lesson 10 Making databases relational
- Lesson 11 Keeping your data safe

Making databases relational 59
6. Click OK, then click OK again to close the Define Database
dialog box.
7. Choose View menu > Layout Mode.
8. Click the portal tool and draw a box to hold the list of names.
9. In the Portal Setup dialog box, show related records from the
Members table.
10. Leave the Initial row value at 1. Change the Number of rows
value to 7.
Each row displays one matching member record.
11. Select Show vertical scroll bar.
12. Click OK.
Add the fields in the portal
1. In the Add Fields to Portal dialog box, select the ::First Name field
and move it to the Included fields list.
2. Select and move the ::Last Name field.
3. Click OK.
4. Use the text tool and create field labels for the First Name and
Last Name field labels above their respective fields in the portal.
The portal should look like this when you are done.
5. Choose View menu > Browse Mode to view your list of members.
6. Test your new structure: type the name of a new member at
ABC Company, then look to see if it appears in the Data Entry
layout. (It will be the last record.)
7. When you are finished with this lesson, Exit or Quit
FileMaker
Pro to close all open files.
For more information
You have seen how to use and create simple relationships.
This tutorial covers just the basics; there are many important points
to consider when building a relational database system. Be sure to
read chapter 3 in the FileMaker
Pro User’s Guide and the relational
information in FileMaker Pro Help before using relationships in your
own files.