
Tutorial
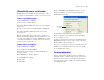

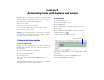

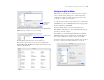

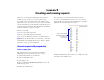
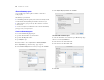
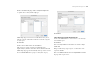
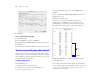
Table Of Contents
- Lesson 1 FileMaker Pro basics
- Lesson 2 Browsing information
- Lesson 3 Finding and sorting records
- Lesson 4 Creating a database and entering records
- Lesson 5 Customizing what you see
- Lesson 6 Creating lists, mailing labels, and form letters
- Lesson 7 Simplifying data entry
- Lesson 8 Automating tasks with buttons and scripts
- Lesson 9 Creating and running reports
- Lesson 10 Making databases relational
- Lesson 11 Keeping your data safe

44 FileMaker Pro Tutorial
11. Click OK.
12. Notice that the insertion point is now in the center of your button.
Type Go to List of Members in your button to identify it.
13. Click outside the button.
If you need to move the button, select it and drag it to the desired
location, as with any other layout element.
To test your button, go to Browse mode and click it. The button takes
you to the List of Members layout.
Perform a series of tasks using a script
As you have just seen, you can use a button to perform a single
command. To make FileMaker Pro perform a sequence of
commands, use a script.
Run a script in the sample file
1. Choose Window menu > Sample08.
2. Choose Scripts menu > Preview Labels Layout.
You should now see the Labels layout, in Preview mode. This
script lets you preview labels before you print.
About scripts
A script lets you construct a series of instructions for FileMaker Pro
to perform. Like buttons, scripts allow you to automate most of the
FileMaker Pro menu commands, as well as activate some commands
not found in the FileMaker Pro menu structure. Simple scripts
can perform a single task, while complex scripts might combine
elements (such as user feedback and control) with programming
techniques (such as branching and looping) to make powerful,
dynamic instruction sets.
Create a script to preview the Labels Layout
1. Choose Window menu > MyFile08.
2. Choose Scripts menu > ScriptMaker.
3. Click New.
4. In the Script Name text box, type Preview Labels Layout.
5. Select the Go to Layout script step and click the Move button. (You
can also select and move script steps by double-clicking them.)
6. In the Script Step Options area, select the Labels layout from the
list of available layouts.
Specify
the List of
Members
layout
Select
Rounded
button