
Tutorial
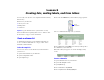
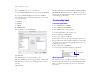
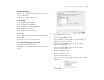
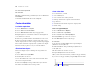
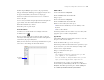

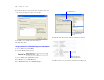
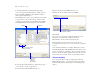
Table Of Contents
- Lesson 1 FileMaker Pro basics
- Lesson 2 Browsing information
- Lesson 3 Finding and sorting records
- Lesson 4 Creating a database and entering records
- Lesson 5 Customizing what you see
- Lesson 6 Creating lists, mailing labels, and form letters
- Lesson 7 Simplifying data entry
- Lesson 8 Automating tasks with buttons and scripts
- Lesson 9 Creating and running reports
- Lesson 10 Making databases relational
- Lesson 11 Keeping your data safe

Creating lists, mailing labels, and form letters 33
Create a label layout
In this section, you will use the New Layout/Report assistant to:
1 create a label layout
1 select fields to include on the labels
Create the label
1. Choose Window menu > MyFile06.
2. Choose View menu > Layout Mode.
3. Choose Layouts menu > New Layout/Report.
4. For Layout Name, type Labels.
5. Select Labels for the new layout type.
6. Click Next.
7. Choose Avery 5160 from the Use label measurements for list.
8. Click Next.
Now you’re ready to specify the label contents.
Choose the fields that will appear on the labels
1. Double-click First Name in the list.
First Name moves to the Label Contents area. The insertion point
flashes.
2. After First Name, type a space.
3. Double-click Last Name in the list.
4. After Last Name, press Enter (Windows) or Return (Mac OS).
This moves the cursor to the next line.
5. Double-click Home Address 1 in the list, then press Enter
(Windows) or Return (Mac
OS).
6. Double-click Home Address 2 in the list, then press Enter
(Windows) or Return (Mac
OS).
7. Double-click City in the list.
8. Type a comma, then a space.
9. Double-click Country in the list.
Now you have set up the merge fields. Your label contents should
look like this:
10. Click Next.