
Tutorial
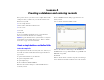
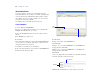

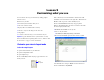
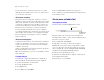
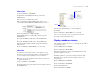
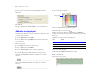
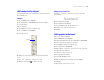
Table Of Contents
- Lesson 1 FileMaker Pro basics
- Lesson 2 Browsing information
- Lesson 3 Finding and sorting records
- Lesson 4 Creating a database and entering records
- Lesson 5 Customizing what you see
- Lesson 6 Creating lists, mailing labels, and form letters
- Lesson 7 Simplifying data entry
- Lesson 8 Automating tasks with buttons and scripts
- Lesson 9 Creating and running reports
- Lesson 10 Making databases relational
- Lesson 11 Keeping your data safe

28 FileMaker Pro Tutorial
9. Select options as shown in the following Number Format
dialog box.
10. Click OK.
11. Choose View menu > Browse Mode to see the formatted data.
Add color to a layout part
You will change the color of the top of the layout to match the colors
of other layouts in the file.
1. Choose Window menu > Sample05.
2. Choose View menu > Layout Mode and look at the header at the
top of the layout.
This is your model.
3. Open MyFile05.fp7 if it is not already open.
4. Choose View menu > Layout Mode.
5. Choose Fee Information from the Layout pop-up menu.
6. Select the Header tab to make that part of the layout active.
Windows: The Header label will become lighter in color when
selected.
Mac OS: The Header label will become darker in color when
selected.
7. Choose the fill color palette.
8. Choose Other Color from the fill color palette.
The header part uses a custom color.
9. Mac OS: Select the sliders icon and choose RGB Sliders
from the Colors dialog box pop-up menu. (Windows users can skip
this step.)
10. Enter these values in the Color dialog box:
11. Do one of the following:
1 Windows: Click Add to Custom Colors, then OK.
1 Mac OS: Click OK.
The header is now colored.
Color Value
Red 170
Green 191
Blue 170
Fill color palette